Manuals

The following text contains hyperlinks. Click on them to be redirected to the websites.
Mobile Apps
The QR codes for Android and iOS to download the T1 app are provided below. Please scan the respective QR code to access the download link.

Scan to download for Android
Itinerary and Transport
The T1 humanoid robot features a compact, lightweight design for effortless handling and transport. Its foldable structure allows it to be conveniently stored in the included suitcase, which contains the Booster Robotics T1 humanoid robot,remote controller,charger and different tools for zero calibration. This well-thought-out design ensures that the T1 remains highly portable compared to other humanoid robots, offering both ease of transport and reliable protection for its components.
Note
Always handle the suitcase with care to prevent damage to the robot and accessories during transport.
Charging
Proper charging procedures are essential to ensure the safe and efficient operation of your Booster Robotics T1 Humanoid Robot. Follow the guidelines below for charging the main battery and the companion remote control.
Battery Charging
Due to self-discharge during transportation and storage, the battery may have low or no power initially. Use the following steps to charge the main battery:
Remove the battery: Detach the battery from the T1 body. Ensure the battery pack strap is pulled out.
Prepare the charger:
Plug the charger into the AC power supply first.
Ensure the battery pack is switched off before connecting it to the charger to avoid damage.
Plug the charger into the AC power supply first.
Ensure the battery pack is switched off before connecting it to the charger to avoid damage.
Prepare the charger:
Connect the charger to an AC power source (100-240V, 50/60Hz).
Verify that the external power supply voltage matches the charger’s rated input voltage (marked on the charger’s nameplate).Failure to match voltages may damage the charger.
Align the plug with the charging port on the battery pack.
Insert the plug according to the indicated direction to ensure a proper connection.
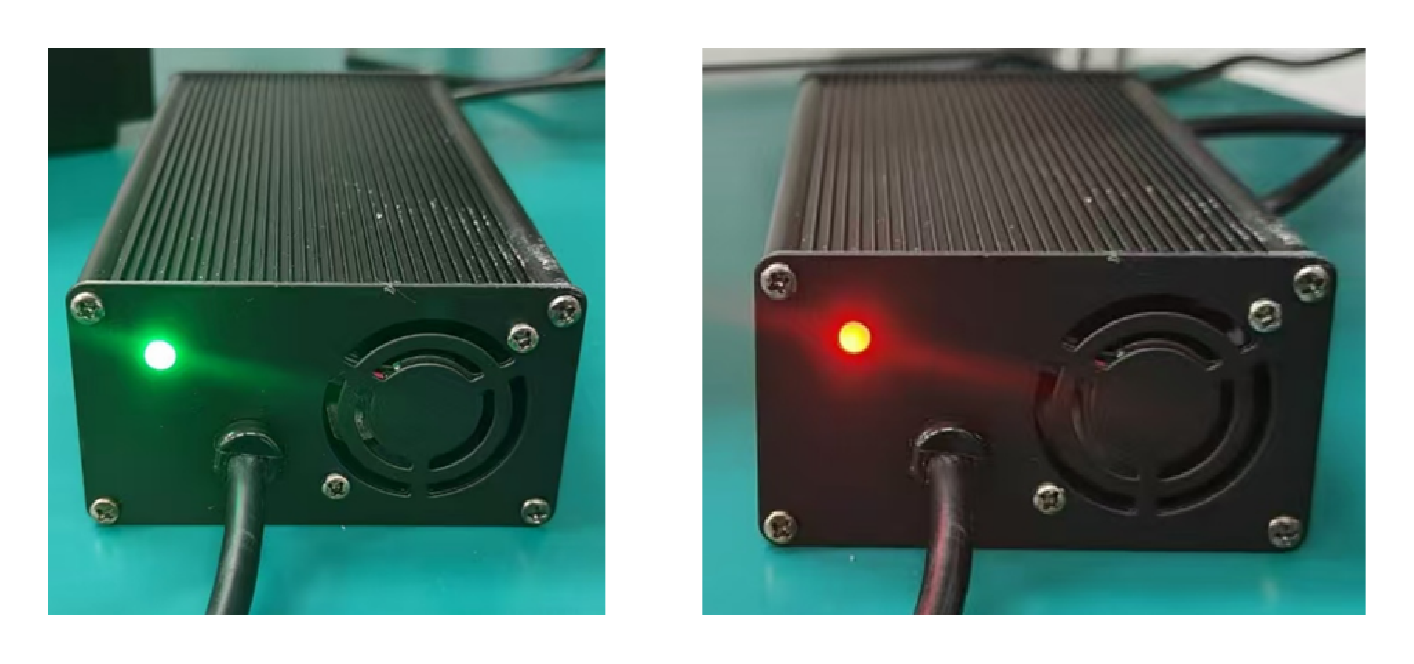
Monitor charging status:
During charging, the battery indicator on the battery pack will flash at a frequency of 1Hz (once per second), displaying the current charge level.
When fully charged, the battery indicator will turn off. Manually disconnect the charger and battery to complete the process.
Temperature precautions:
Allow the battery to cool to room temperature before charging if it is warm from recent use.
Warning
Only use official chargers to charge the T1 battery. Using unofficial chargers may cause damage or safety hazards. - Connect the charger to an AC power source (100-240V, 50/60Hz).
Verify that the external power supply voltage matches the charger’s rated input voltage (marked on the charger’s nameplate). Failure to match voltages may damage the charger.
Battery Charging Indicator
The charging indicator lights display the current charge level as shown in the table below:
Indicator Lights |
Current Battery |
Description |
|---|---|---|
LED1 |
0%-20% |
Lowest battery level |
LED1, LED2 |
20%-40% |
Partial charge |
LED1, LED2, LED3 |
40%-60% |
Moderate charge |
LED1, LED2, LED3 , LED4 |
60%-80% |
Fully charged |
All LEDs |
80%-100% |
Fully charged |
Remote Control Charging
To ensure the proper functioning of the companion remote control, follow these charging guidelines:
Use a 5V/2A USB charger that complies with FCC/CE standards.
Make sure the remote control is turned off before charging.
Connect the remote control to the charger using a USB Type-C cable.
Monitor the charging indicator light: - The power indicator will blink at 1Hz (once per second) while charging, displaying the current charge level. - Once the indicator turns off, charging is complete. Disconnect the charger to avoid overcharging.
Remote Charging Indicator
The charging indicator lights display the current charge level as shown in the table below:
Note
For optimal battery life, avoid overcharging and ensure all devices are disconnected after charging.
Unpacking and Initial Setup
Follow the steps below to properly unpack and prepare the Booster Robotics T1 Humanoid Robot for operation.
Unpacking
Position the box on a level surface with the front side facing upward.
Open the top of the box and gently lift the robot out as a whole.
Take out all included components, such as the robot, remote control, charger, and accessories.
Set the robot on a stable, flat surface to prepare for powering it on.
Important
Handle all components with care to avoid damage during unpacking.
Pre-Power-On Checklist
Before powering on the T1, ensure the following:
Use only genuine Booster Robotics parts and verify that all components are in proper working condition.
Do not operate the robot while under the influence of alcohol, drugs, or any condition that may impair concentration.
Familiarize yourself with: - The characteristics of each gait mode. - The emergency braking procedure for handling instability or loss of control.
Inspect the robot and its components to ensure they are free from foreign objects such as water, oil, sand, or debris.
Confirm that both the remote control and battery pack are fully charged before operation.
Powering On
Attention
T1 must first enter PREP mode and be placed in a stable standing position on the ground before switching to WALK mode.
DO NOT lift T1 while it is in WALK mode.
Ensure the ground is clear of obstacles and take precautions to prevent human injuries while operating T1.
DO NOT touch any part of T1 while in WALK mode, except for the designated handle.
Remove all zeroed parts before restarting T1 to ensure proper operation.
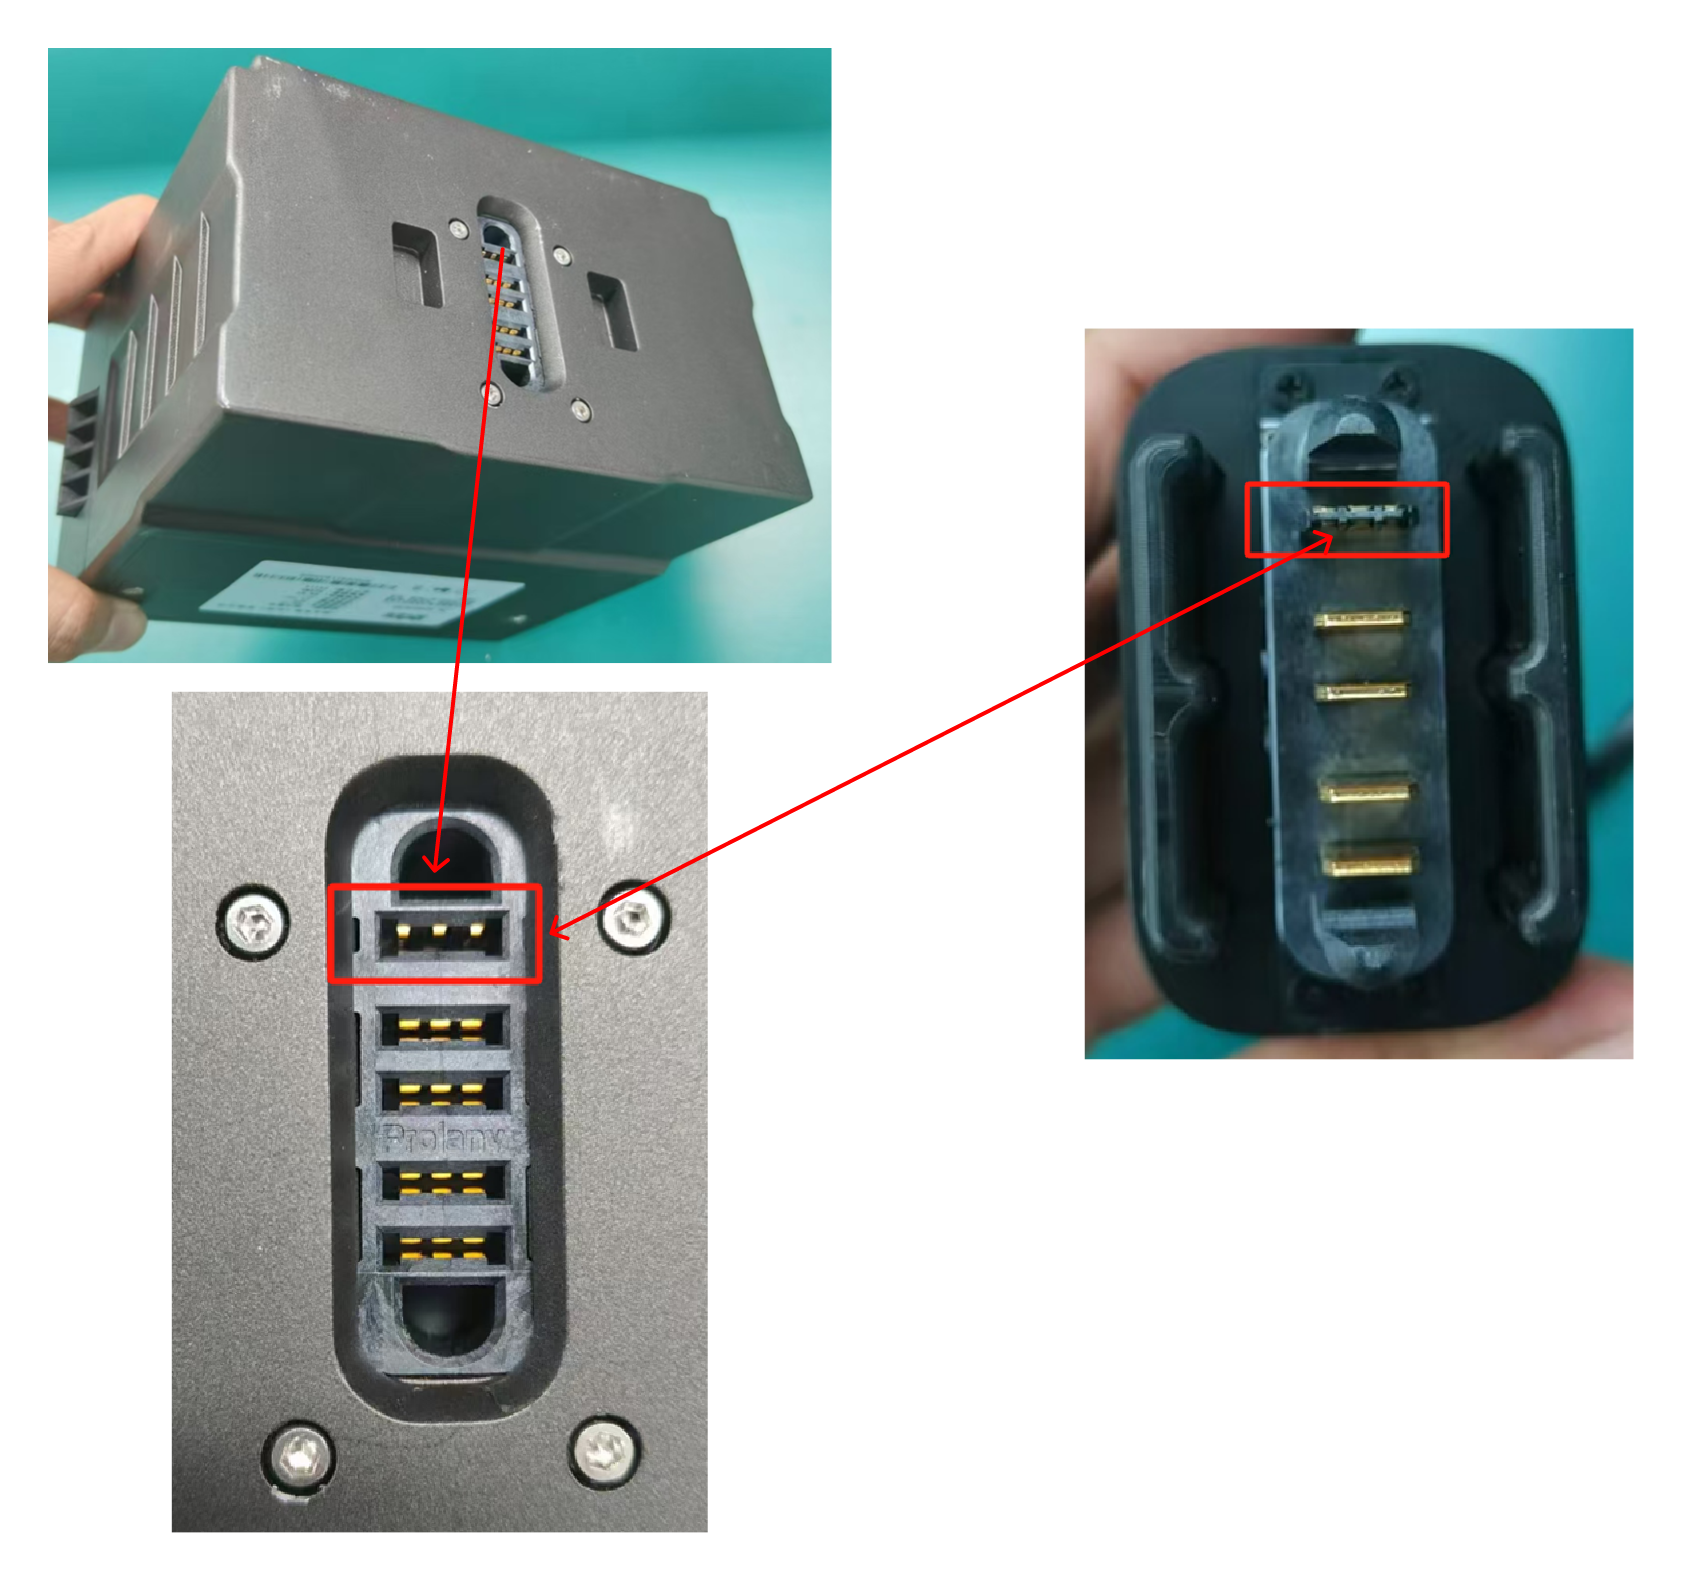
Installing Battery Pack
Insert the battery into the battery compartment on the back of the robot.
If the battery does not fully insert, adjust its direction. Do not forcefully press it to avoid damaging the battery interface and buckle.
Listen for a “click” sound, indicating the battery is securely installed. Verify the buckle is in place.
Preparation Before Startup
Position the T1 robot securely on a stable surface.
Pass a rope through the designated suspension buckles on both shoulders of the robot and secure it with a firm dead knot.
Connect the other end of the rope to the suspension buckle of the protective frame.
Carefully lift the T1, ensuring that its body is fully suspended and its feet are off the ground.
Install the battery pack. Slide the pack into the battery socket, with lights facing outwards.
Body Placement
While hanging, position the robot’s arms and legs naturally.
Ensure the joints are not entangled before proceeding.
Starting Up the Robot
Short-press the power button on the battery once.
Press and hold the power button for more than 5-10 seconds to power on the battery.
Boot Process
The boot process takes approximately 1 minute.
After a successful boot, T1’s head will move once, indicating that it has entered DAMP mode.
Note
During the booting process, T1 must remain completely stationary to ensure proper IMU initialization.
Use the remote control:
Press
RT + Yon the joystick to enter PREP mode, allowing T1 to be placed on the ground and positioned in a stable standing posture.
The T1 will assume a neutral posture, as shown in the following image.
Lowering and Activating the Robot
Gradually lower the suspension rope until the T1’s feet touch the ground.
Press RT + A to enter WALK mode, enabling T1 to respond to walking commands.
Note
DO NOT attempt to lift T1 while it is in WALK mode.
Emergency Stop
In emergencies, such as potential falls, collisions, or motor malfunctions, an emergency stop is necessary.
The emergency stop button has two states: pressed (activated) and released (deactivated). Pressing it once activates the emergency stop, and pressing it again deactivates it.
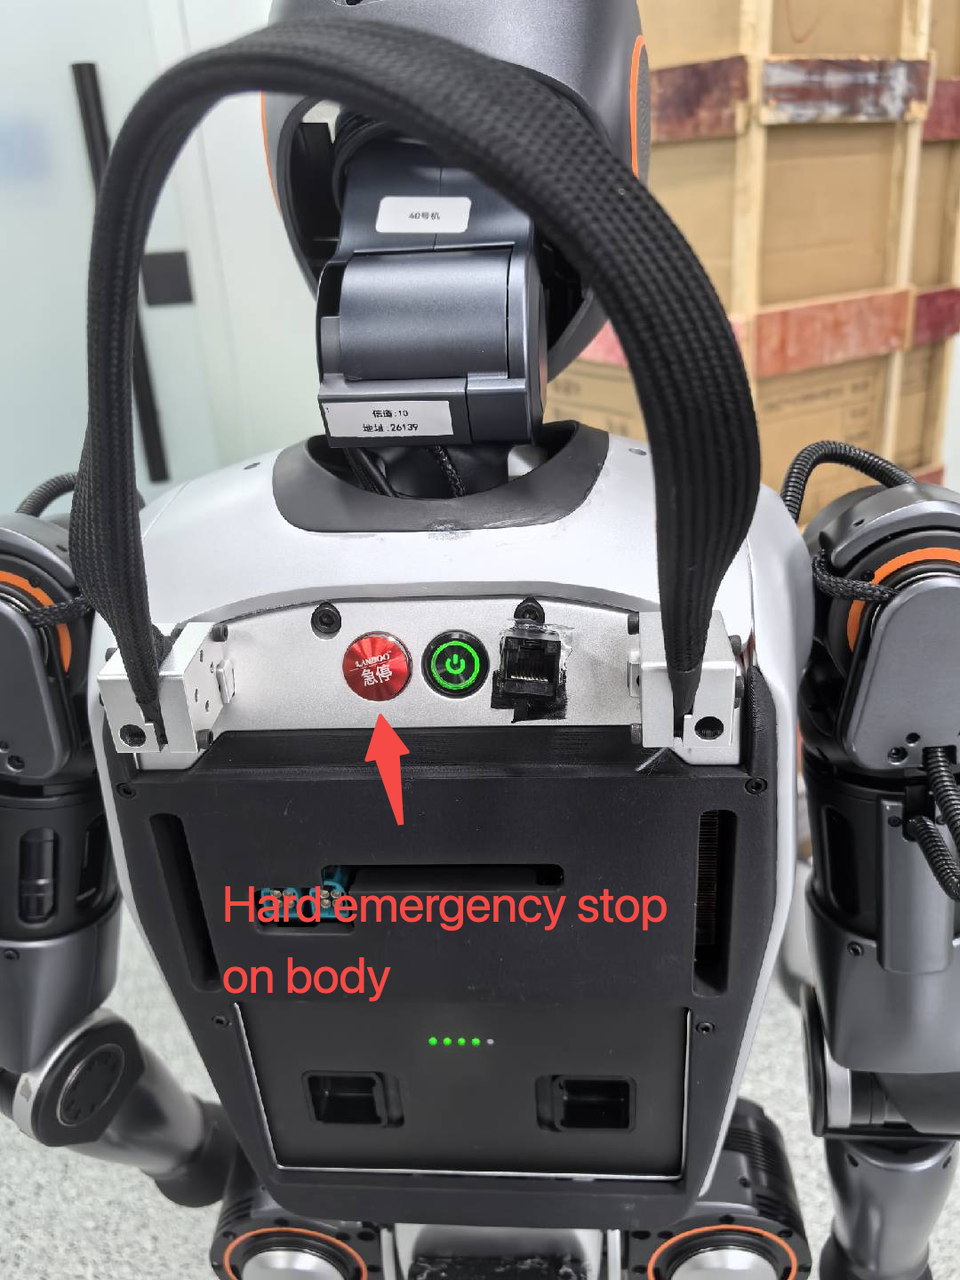
Attention
When the emergency stop is activated, the robot must be restarted—either by restarting the robot control service or rebooting the robot—to resume operation.
Switching Off
Resuspend T1 on the protective frame to ensure it is stationary. The rope should maintain tension on the robot.
Perform the following steps to power off:
Press RT + Y on the joystick to enter PREP mode, allowing T1 to be lifted and placed on the rest.
Press RT + X to switch to DAMP mode.
Press the power button to shut down T1.
After shutting down:
Arrange the robot’s arm and foot joint limits for proper storage.
Remove the battery pack as described above if T1 will not be used for a long time.
Packing
To ensure the safe transport of the T1 robot, follow the steps below to pack it securely in the transport box.
Caution
This process requires two persons for safe handling.
Place T1 with its head and chest facing downward, lying flat on the ground, ensuring it is correctly oriented.
Position the transport box next to the robot, ensuring it is ready for use.
Gently lift T1’s using its legs and arms, then carefully place it into the transport box with its head and chest facing downward, ensuring a secure fit.
Twist and fold the arms as shown in the provided GIFs:
Fold T1’s legs back towards its body, ensuring they fit snugly against the lining of the transport box for secure placement.
Add protective buffers, include accessories (remote control, charger, etc.), and secure the square lining in the middle of T1.
Basic Operation
Remote Control
The Logitech F710 remote control is part of the T1 remote control module, equipped with a digital transmission module and a Bluetooth module. Using the Booster Robotics Explore App, the robot and remote control can be bound for seamless connection upon powering on.
Features:
3-axis posture and position stability control for enhanced balance and maneuverability.
Versatile movement capabilities, including:
Forward, backward, left, right, and in-place turning.
Predefined walking patterns such as straight-line, circular, linear, and rectangular paths.
Adaptability to various terrains, including flat surfaces, slopes, and steps.
Ergonomic design ensures a comfortable grip and intuitive control experience.
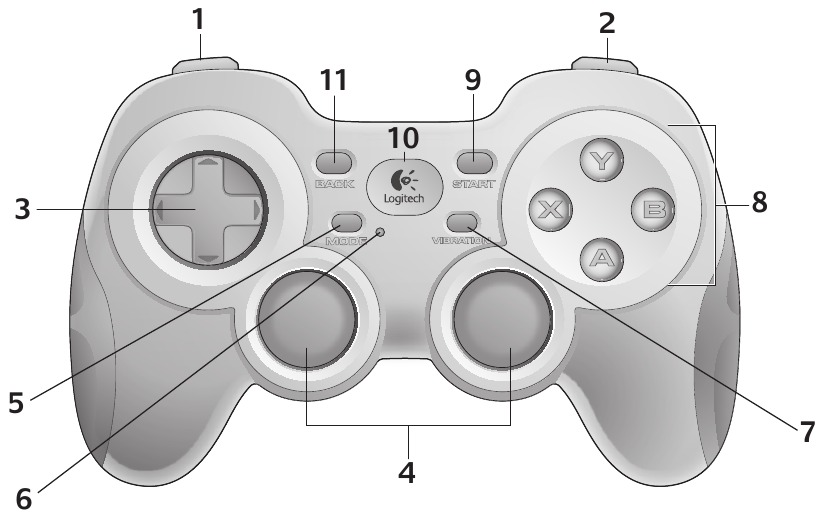
Key Components
The remote control consists of the following key parts:
[1] Left button/ trigger
[2] Right button/ trigger
[3] D-pad
[4] Two analog mini-sticks
[5] Mode button
[6] Mode/status light
[7] Vibration button
[8] Four action buttons
[9] Start button
[10] Logitech button
[11] Back button
Concept Descriptions
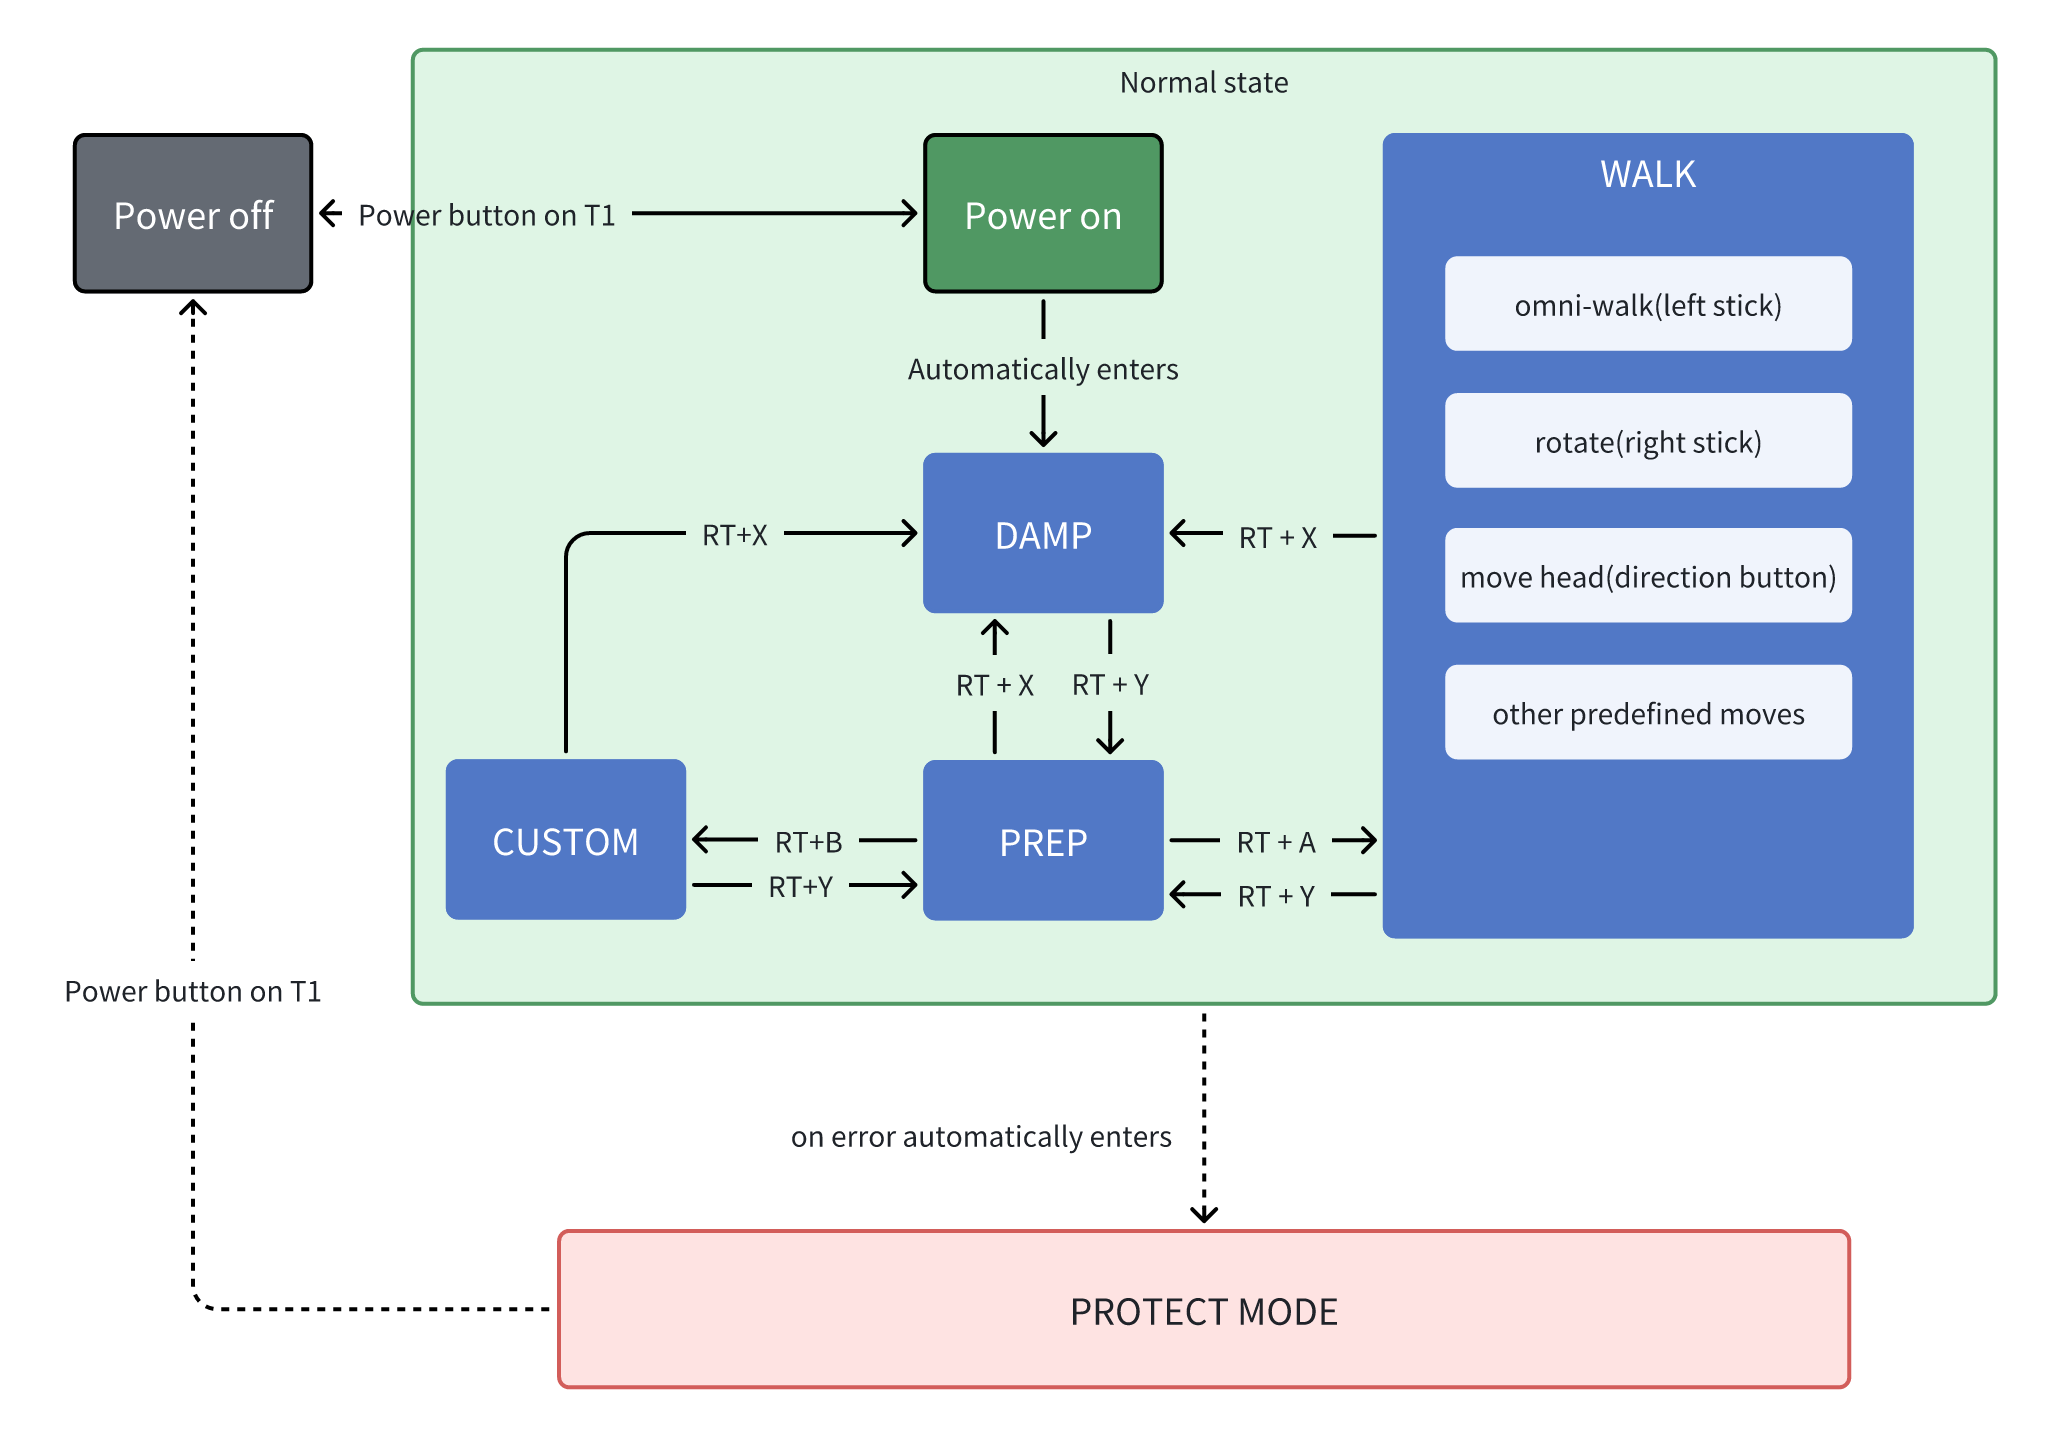
The T1 robot features several operational modes. Below is a detailed explanation of each mode:
Mode |
Switchable To |
Description |
|---|---|---|
Damping Mode |
PREP Mode |
Motors stop active motion but provide resistance, allowing transition to ready mode. |
PREP Mode |
WALK, CUSTOM, DAMP Modes |
T1 stands in a stable posture but does not self-balance |
WALK Mode |
PREP, DAMP Modes |
Enables dynamic movements, including walking and rotation. |
CUSTOM Mode |
PREP, DAMP Modes |
Allows full control via the SDK. |
PROTECT Mode |
DAMP Mode |
Activated on error (e.g., falls, joint limit breaches).. |
Mode Switching
The robot allows seamless transitions between modes using specific commands:
Key Descriptions
Posture Modes
Use the following button combinations to switch between various posture modes:
Mode |
Button Combination |
|---|---|
DAMP Mode |
RT + X |
PREP Mode |
RT + Y |
WALK Mode |
RT + A |
Move (Omni-walk) |
Left Joy Stick |
Rotate |
Right Joy Stick |
Move Head |
Direction Buttons(D-pad) |
Wave Hand (<v1.0.4) |
RB |
Wave Hand (>=v1.0.4) |
B |
Interactive Functions
The T1 robot supports various interactive gestures. Use the table below for guidance:
Gesture |
Button Combination |
Description |
|---|---|---|
Wave Hand |
Click RB (<v1.0.4) Click B (>=v1.0.4) |
Robot waves its hand. |
Handshake |
Click A |
Robot performs a handshake gesture. |
End Factor Control |
RT + RB |
Start/Stop hand-end-effector control mode. |