Quick-Start
K1 is packed with an out-of-the box motion control program. Follow the instructions below to control K1 remotely.
Unboxing and Package Contents
The K1 robot is typically shipped in a hard-shell case to ensure its safety.
Package Contents: The main package contains the K1 robot, charger and stand.
Battery: The battery and controller are shipped separately in order to comply with shipping regulations.
For a general idea of the unboxing process and initial startup, you can refer to the following video: Booster Robotic T1 How to start | Bipedal GmbH.
Warnings
K1 must first enter PREP mode, and then put to a stable standing position on the ground, before switching to WALK mode.
DO NOT lift K1 while under WALK mode.
Make sure to clear any obstacles on the ground and avoid human injuries while operating K1.
DO NOT touch any parts of K1 while under WALK mode, except for the handle.
Make sure to remove ALL zero parts before restarting K1.
Modes
K1 operates under Modes.
K1 can perform different Actions under different Modes.
Modes can switch to one another but with constraints. For example, DAMP Mode can only switch to WALK mode by first entering PREP Mode.
DAMP Mode
Power is on and motion control is working.
All joints are in a dampening state, i.e, joints will resist position change, but will neither try to hold its position nor actively change its position.
K1 is NOT able to stand under DAMP mode, therefore support is needed.
DAMP mode is a safe mode, entering DAMP mode can protect K1 and its operator.
DAMP mode can be switched to PREP mode, but not directly to WALK mode.
PREP Mode
Power is on and motion control is working.
K1 assumes a standing posture and holds it. Joints will strongly resist position change, and try to go back to the standing posture if forcefully moved.
K1 under PREP mode can stand on its own on the ground. Under PREP mode K1 can be placed to stand on the ground. However, it will NOT try to balance itself.
K1 can swtich to ALL other modes under PREP mode, including DAMP and WALK.
WALK Mode
Power is on and motion control is working.
Under WALK mode, K1 can perform various predefined actions, including omni-walk, rotating, stepping, standing-still and moving head.
Compared to PREP mode, WALK mode is more resilient, and will try to recover balance if pushed.
K1 under WALK mode can switch to all other modes, including DAMP and PREP.
NOTICE: Make sure K1 is under PREP mode and is already standing firmly on the ground, before switch to WALK mode.
CUSTOM Mode
Power is on and motion control is working.
K1 gives up control on all joints to developer, who controls K1 through its SDK. Use caution under CUSTOM mode to avoid damage to K1.
Only PREP and DAMP modes can switch to CUSTOM mode.
CUSTOM mode can only switch to PREP or DAMP mode.
While developing new tricks on K1, it is recommended to use a Hoist at all times under CUSTOM mode.
PROTECT Mode
PROTECT mode will automatically kickin on errors (i.e, exceeding joint limit or falling).
Joints under PROTECT Mode behave the same as DAMP mode.
You can try to reenter DAMP mode under PROTECT mode. (Soft restart)
PROTECT mode is a safe mode, entering PROTECT mode can protect K1 and its operator.
Powering on
Hoist/Crane: No crane is required for basic startup. However, a hoist is recommended for all development, especially when using CUSTOM mode.
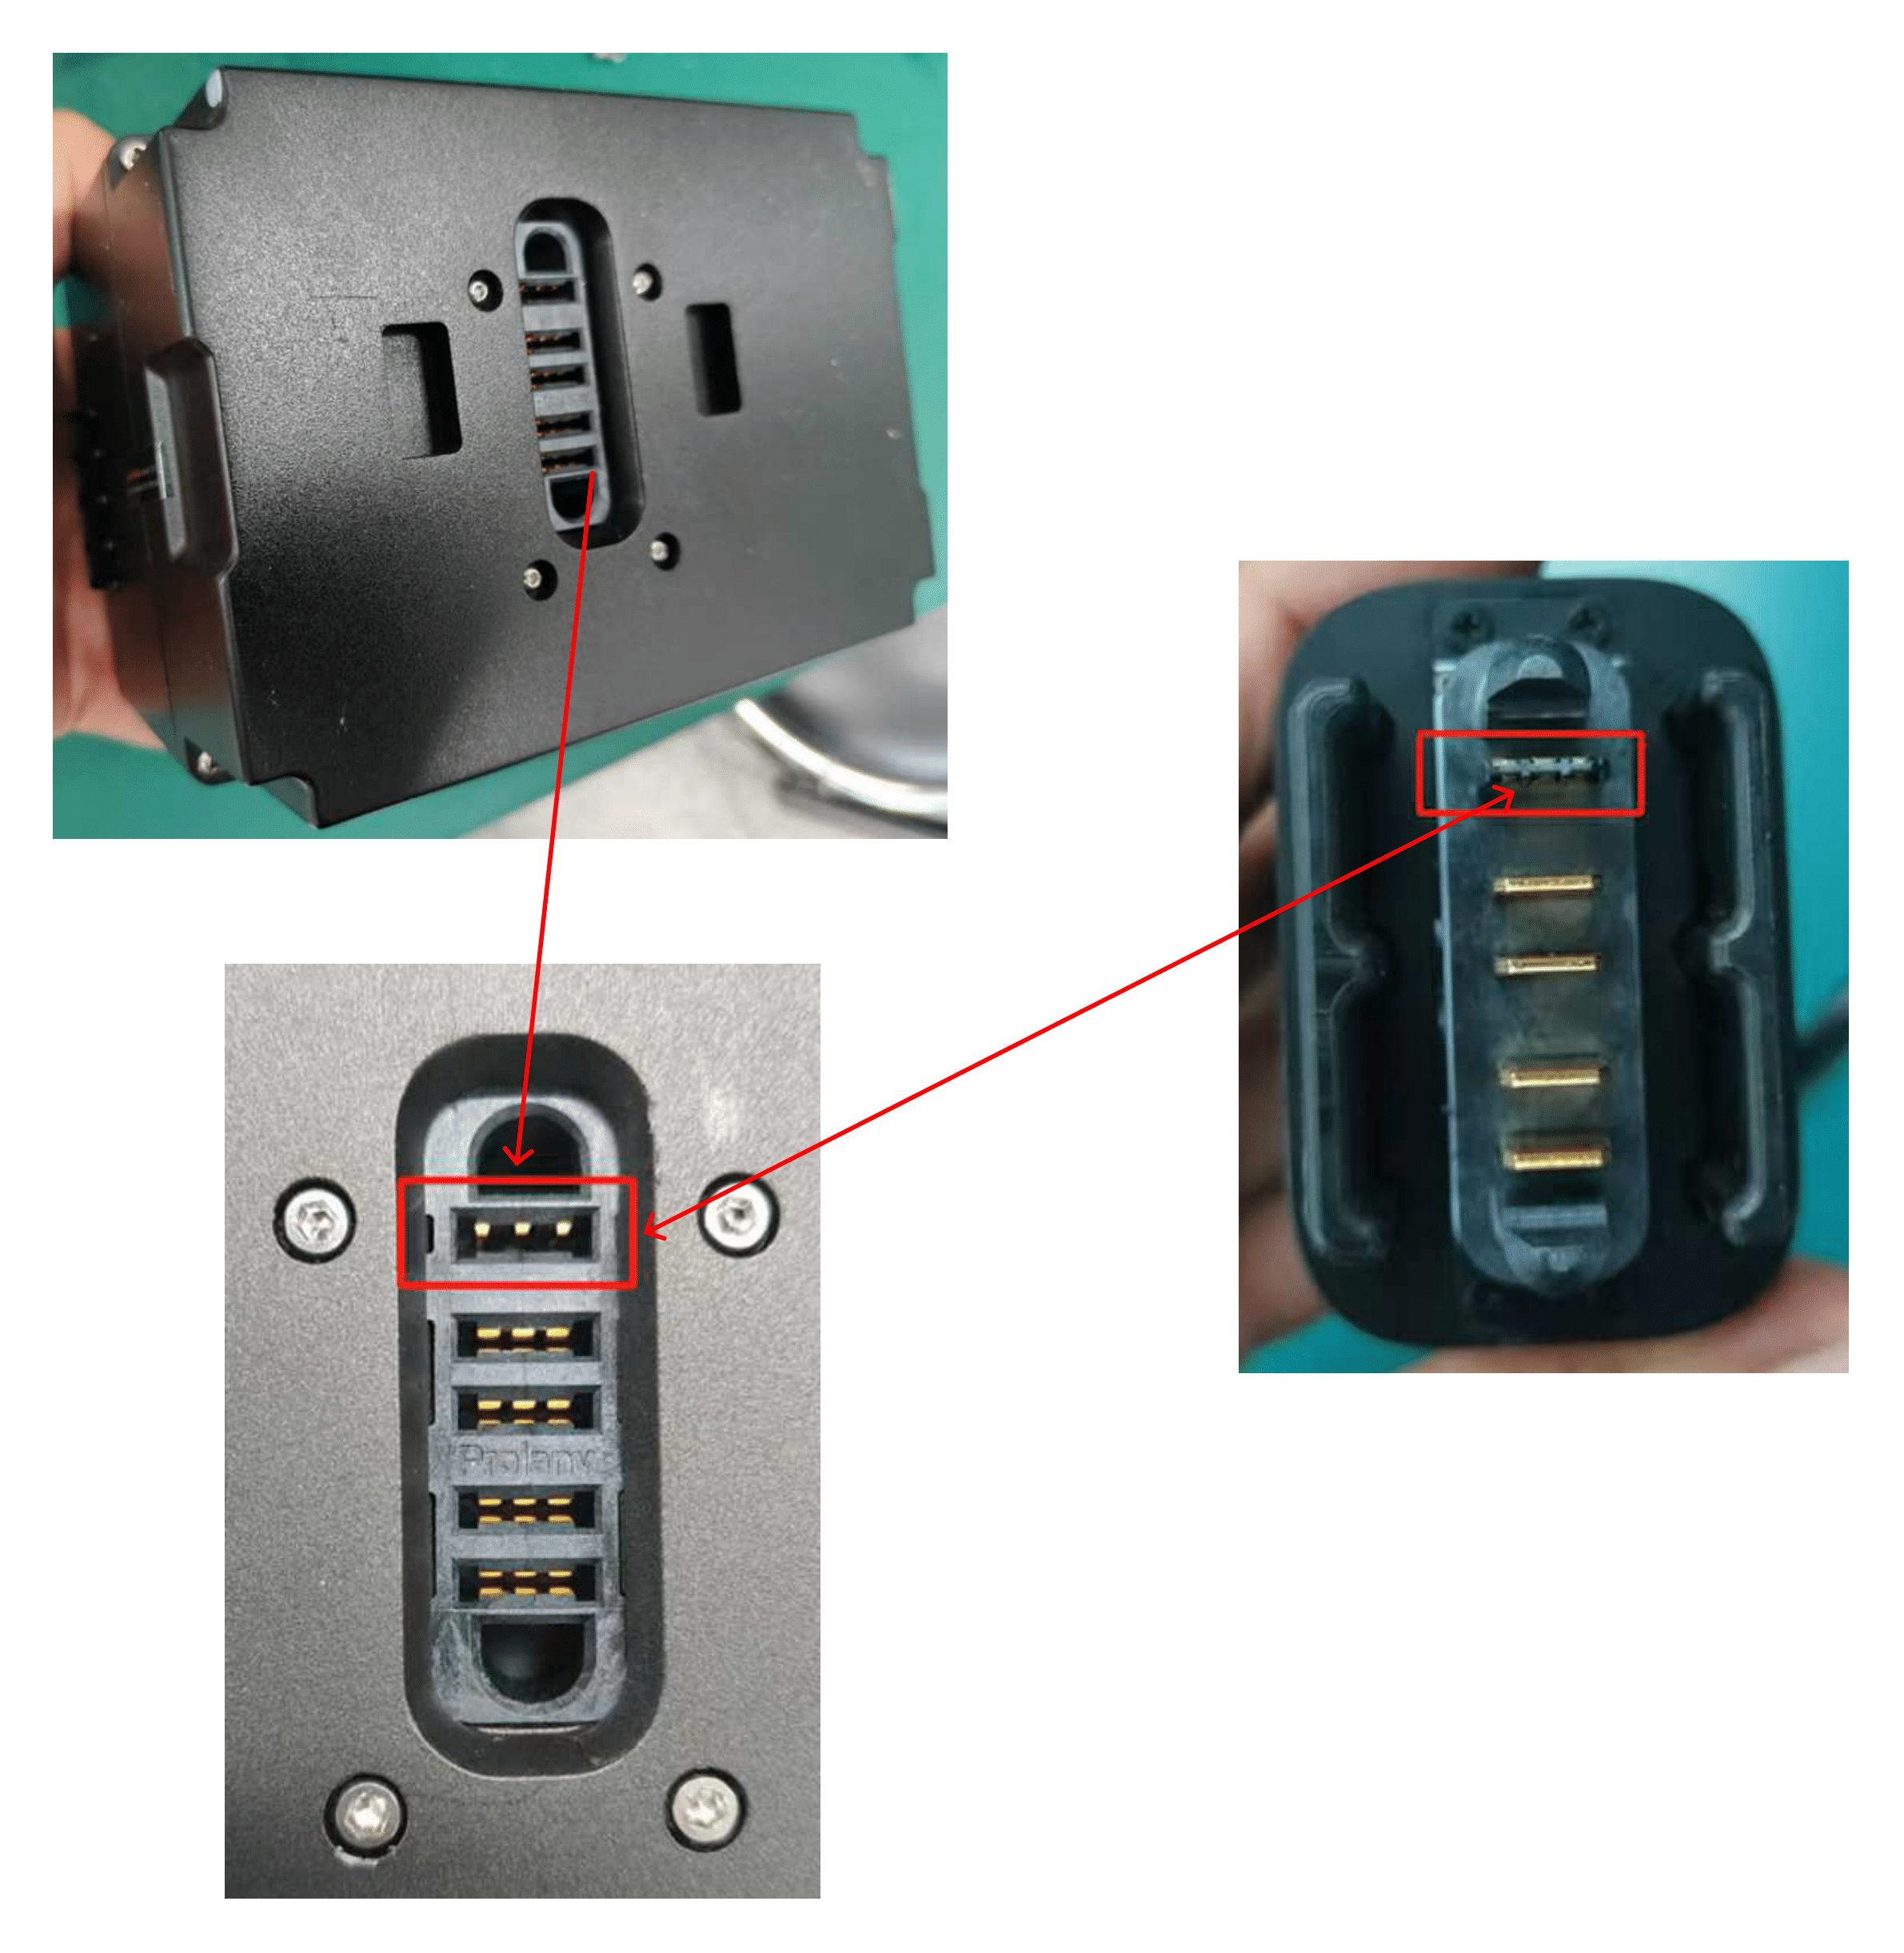
Battery Installation: The battery pack is keyed and can only be inserted in the correct orientation. It cannot be installed incorrectly.
Charging: The battery cannot be charged while inside the robot. It must be removed and connected to the provided charger (See section 2.10).
Get-up: To have the robot stand up from a lying position, use the joystick command LT + Right (See section 2.7.1 and video in 2.1).
Runtime: For continuous operation longer than 2 hours, a second charged battery is required for a quick swap.
Place K1 on its rest.
Install the battery pack. Slide the pack into the battery socket, with lights facing outwards.
Place K1’s hands and legs in a natural posture.
Press Power button about 2s (release it after light turns on; press more than 8s, the robot will be powered off), the robot is powered on. Wait for about one minute, the robot will play a prompt tone. Then the robot can be remotely controlled. NOTE: The initialization of IMU requires that K1 remains stationary during the booting process.
Press LT+START on the joystick to enter PREP mode, after which K1 can be placed on the ground, and put in a standing position.
Press LT + RT + A to enter WALK mode, after which K1 will response to walking commands. NOTE: DO NOT try to lift K1 while under WALK mode.
Shutting down
Press LT+START on the joystick to enter PREP mode, after which K1 can be placed flat on the ground.
Press LT+BACK to enter DAMP mode, and then press the power button to shut down K1.
After powering off, you need to wait for 5 seconds before you can power it on again
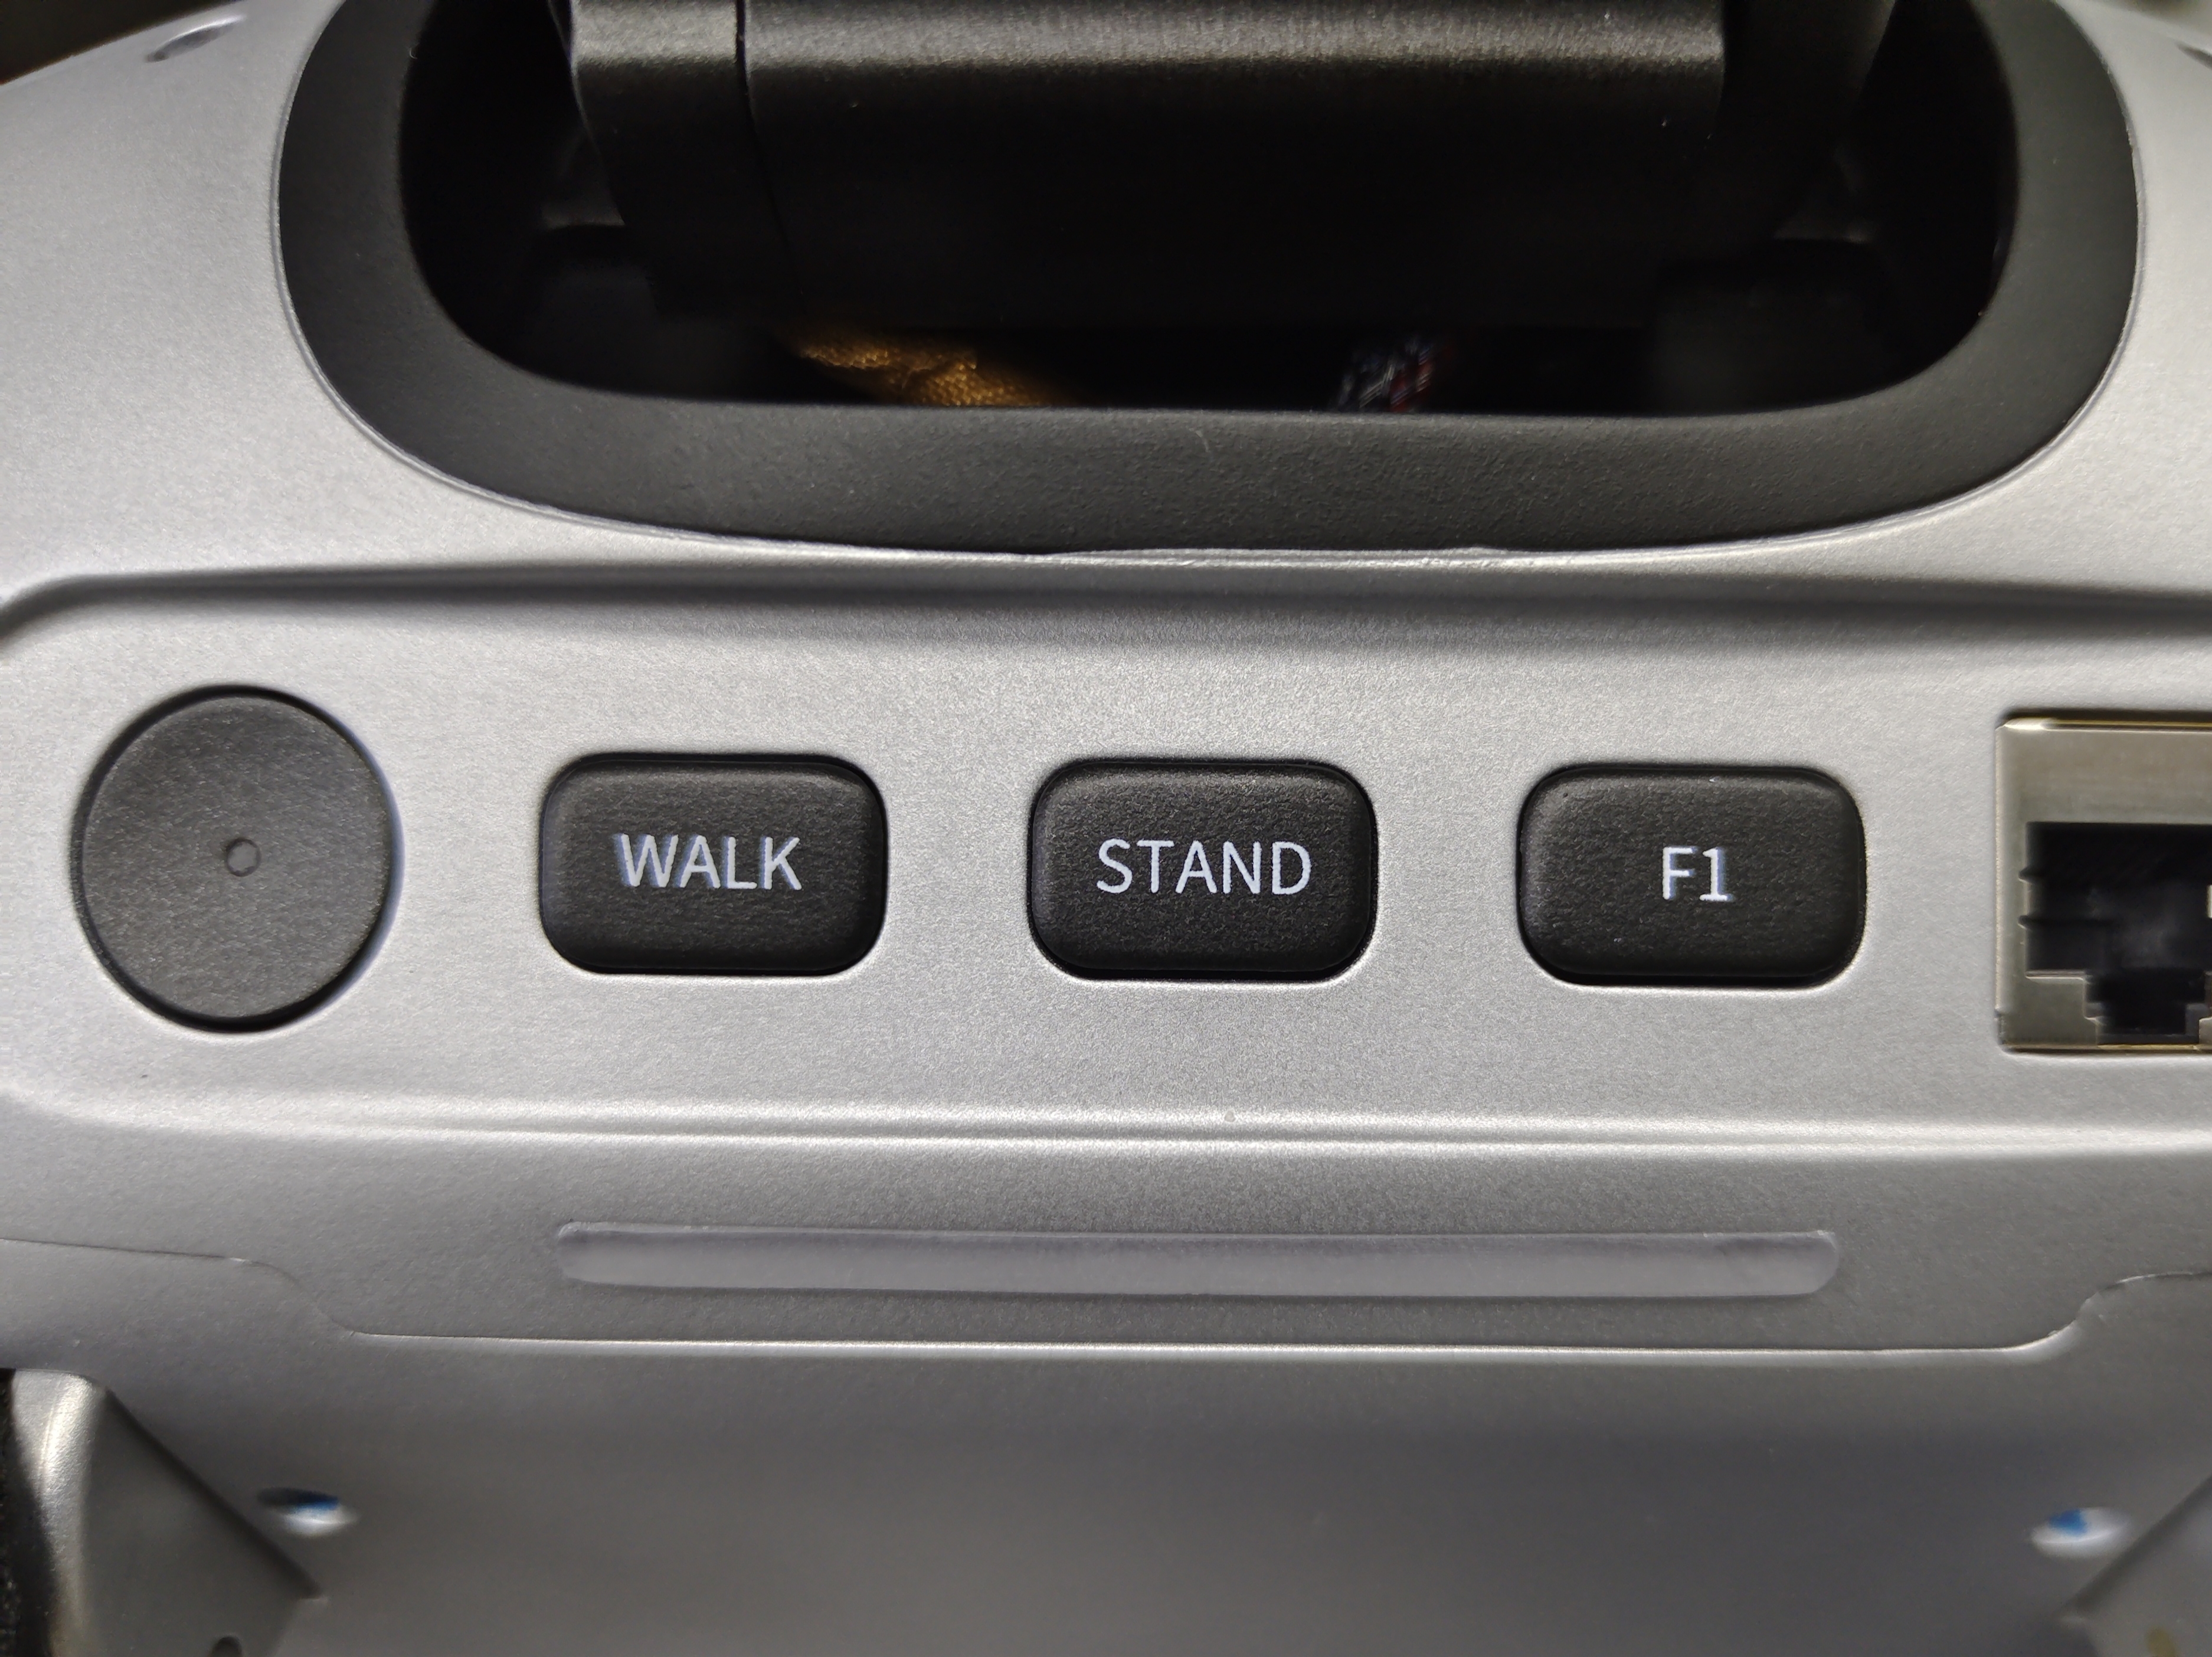
Back Panel Buttons
In addition to the power button, there are three other buttons on the back of K1, namely: WLAK/STAND/F3.
The WLAK button is used to enter the walking mode, and the STAND button is used to enter the ready mode.
The F3 button allows users to customize its function through the configuration file
/opt/booster/Gait/configs/K1/task_instruction.yaml. By default, it is used to enter the damping mode.
Joystick control
Keymap
K1 is equiped with a XBOX-compatible joystick. Make sure control mode is Receiver Mode, with 4 LEDs ON.
Function |
Button |
|---|---|
Damping Mode - Enter damping mode |
LT + BACK |
Preparation Mode - Enter preparation mode |
LT + START |
Walking Mode - Enter walking mode |
LT + RT + A |
Walking Mode - Get up and enter walking mode |
RB + UP |
Walking Mode - Locomotion control |
Left stick |
Walking Mode - Rotation control |
Right stick |
Walking Mode - Head rotation |
Direction buttons |
Walking Mode - Start/end handshake |
A |
Walking Mode - Start/end wave hand |
B |
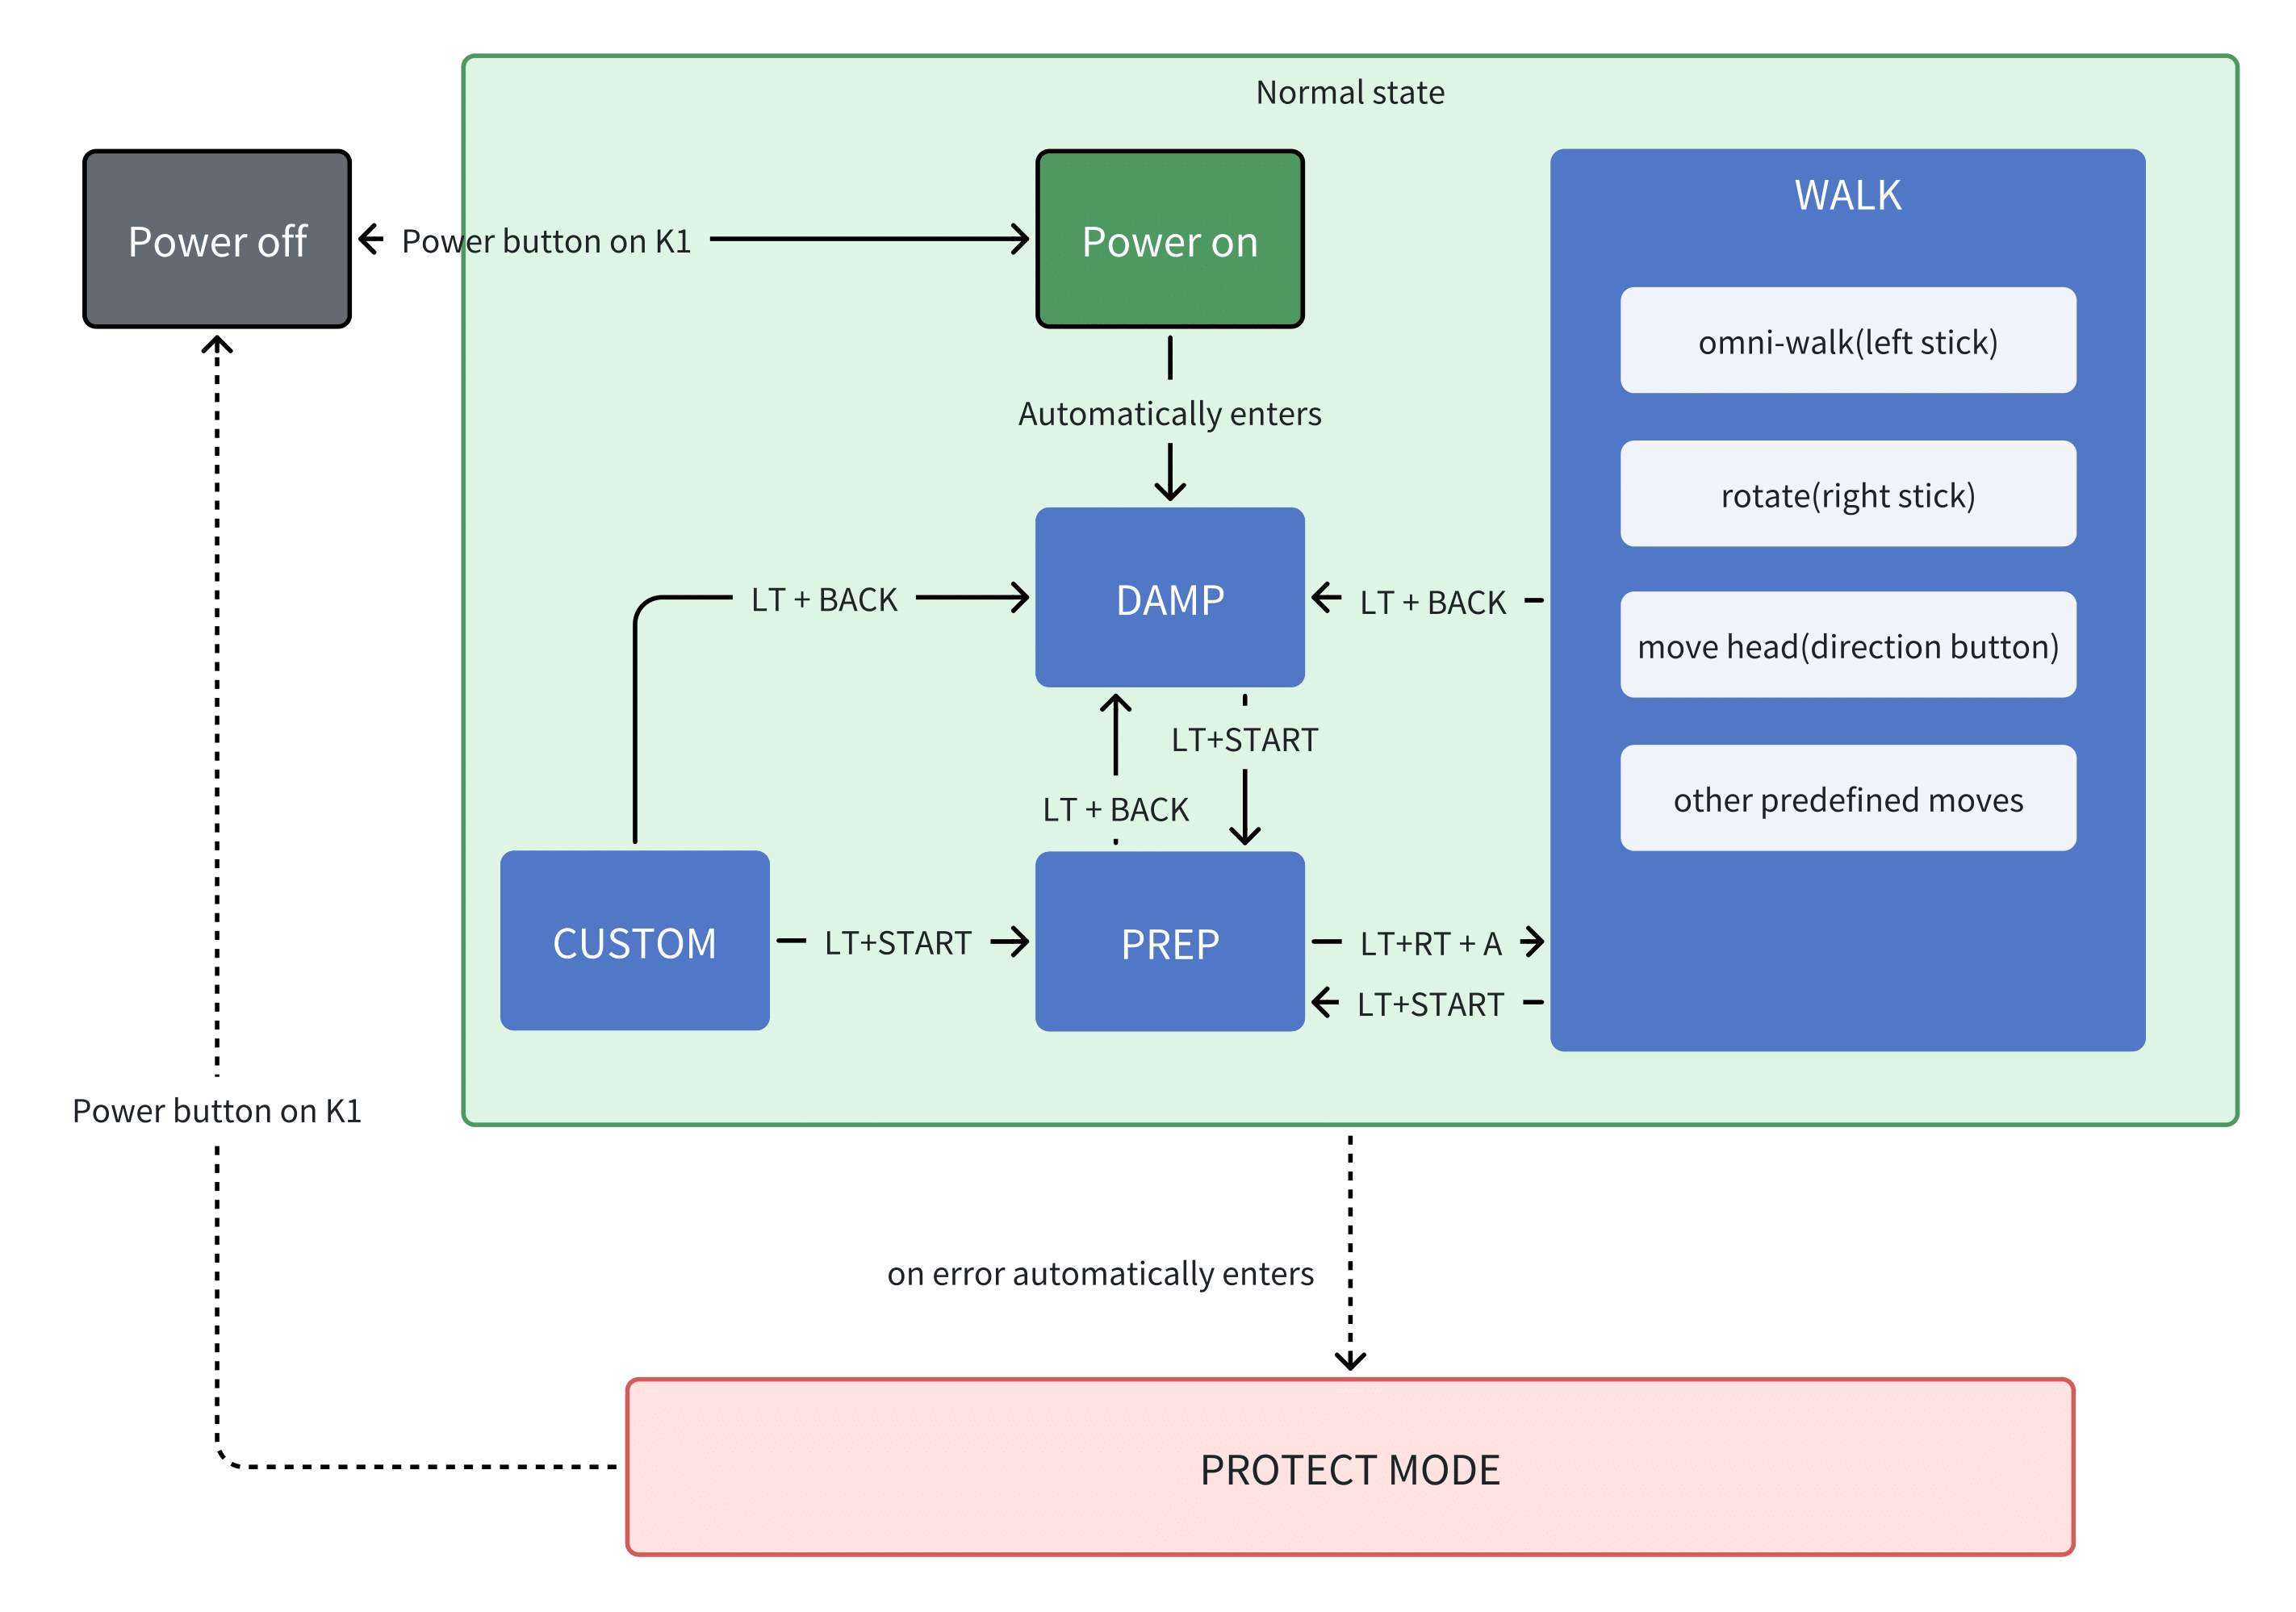
State map
Connect to Robot
Connect via App
Download and install app: Android App Download
Connect via Terminal
Wired Connection
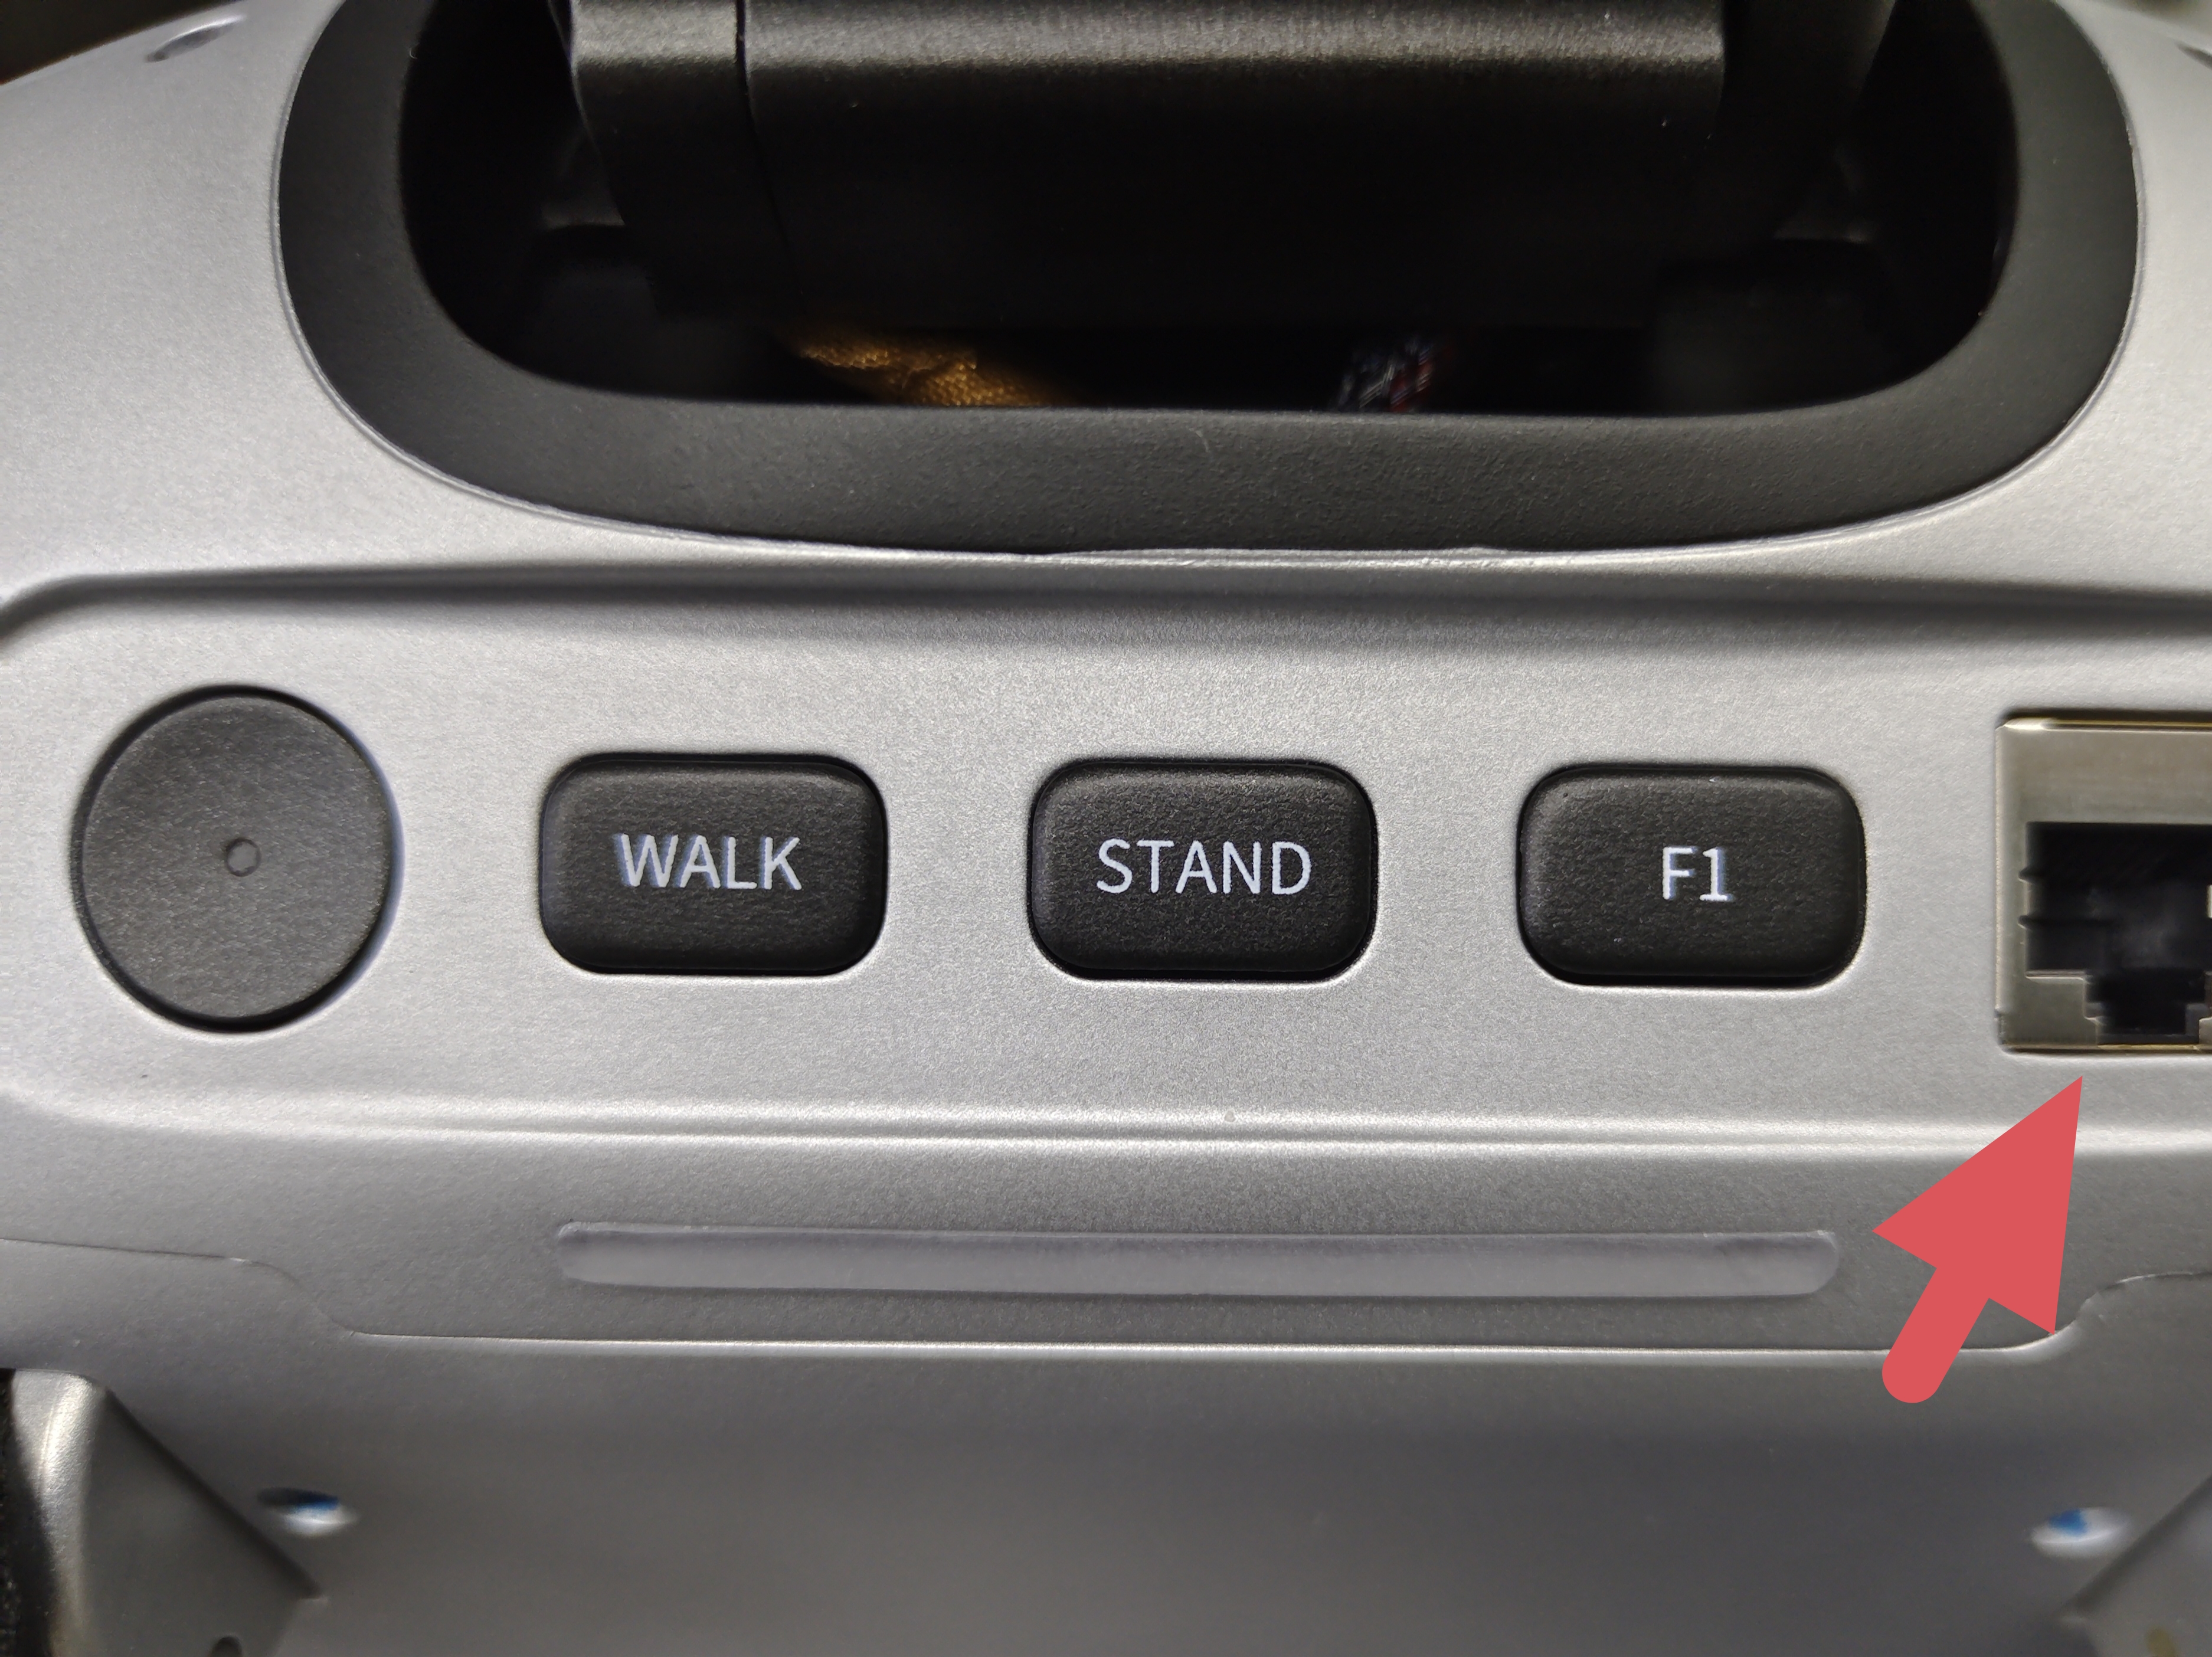
Connect via Ehternet, and configs the wired network in manual mode as following
address: 192.168.10.10
netmask: 255.255.255.0
gateway: 192.168.10.1
Static IP Configuration Steps Reference:
Connect the development machine to the robot using an Ethernet cable. The robot’s network port is shown in the image.
Log in to the robot using SSH Open the command-line tool (Terminal) and enter the following command.
# Log in to K1 via Ethernet cable
ssh booster@192.168.10.102
# Initial password: 123456
Wireless connection
Configure robot’s wireless connection via App. Find wireless ip of robot in app, eg xxx.xxx.xxx.xxx
Log in to the robot using SSH
# Log in to K1 via Wi-Fi connection
ssh booster@xxx.xxx.xxx.xxx
# Initial password: 123456
Connection Help
Forgot Password? If you forget your password, please contact our support team at support@bipedal.de for reset instructions.
Finding the IP: If you don’t know the robot’s IP address on your Wi-Fi network, you can use a network scanning tool like
nmap(e.g.,nmap -sn 192.168.1.0/24) or a mobile app like ’Fing’ to find devices on your network.
We are here for you!
Of course, we are always here for you after your purchase. If you have any questions or run into issues, please send us an inquiry at support@bipedal.de.
Robot Control Service Start/stop
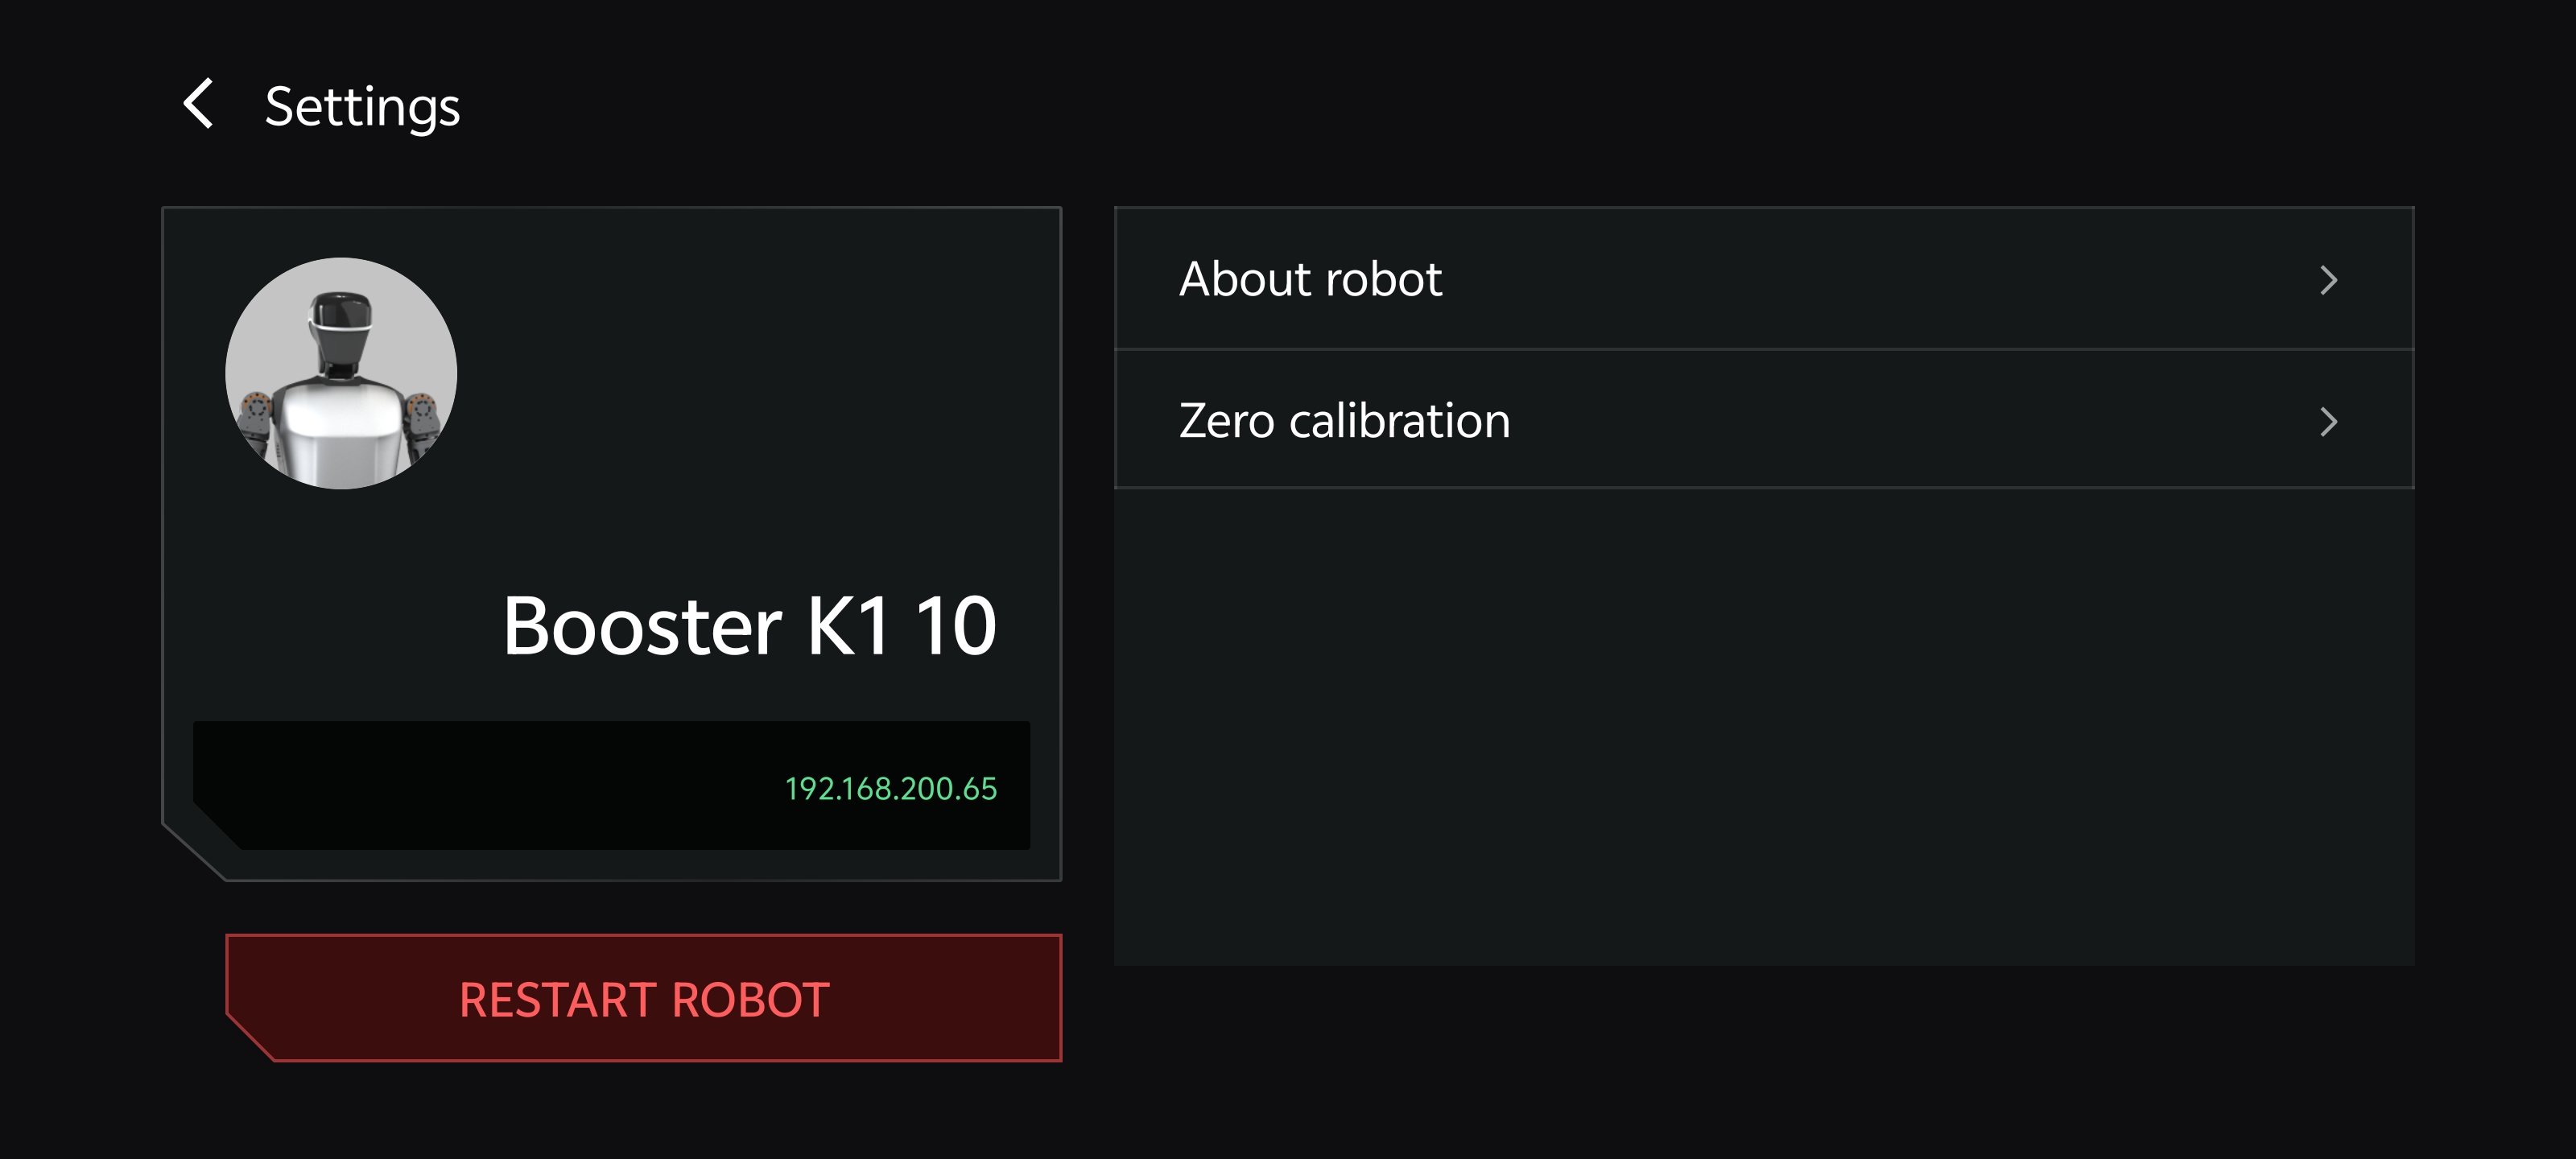
Via App (Android only)
Click the gear icon in the upper right corner on the main page to enter the settings page.

Click “Restart the robot” in the lower left corner of the settings page.
Via Terminal
Connect to robot via Terminal (Refer to “Connect via Terminal” section)
Execute comand below
# start robot control service
booster-cli launch -c start

# stop robot control service
booster-cli launch -c stop

# restart robot control service
booster-cli launch -c restart
Charging
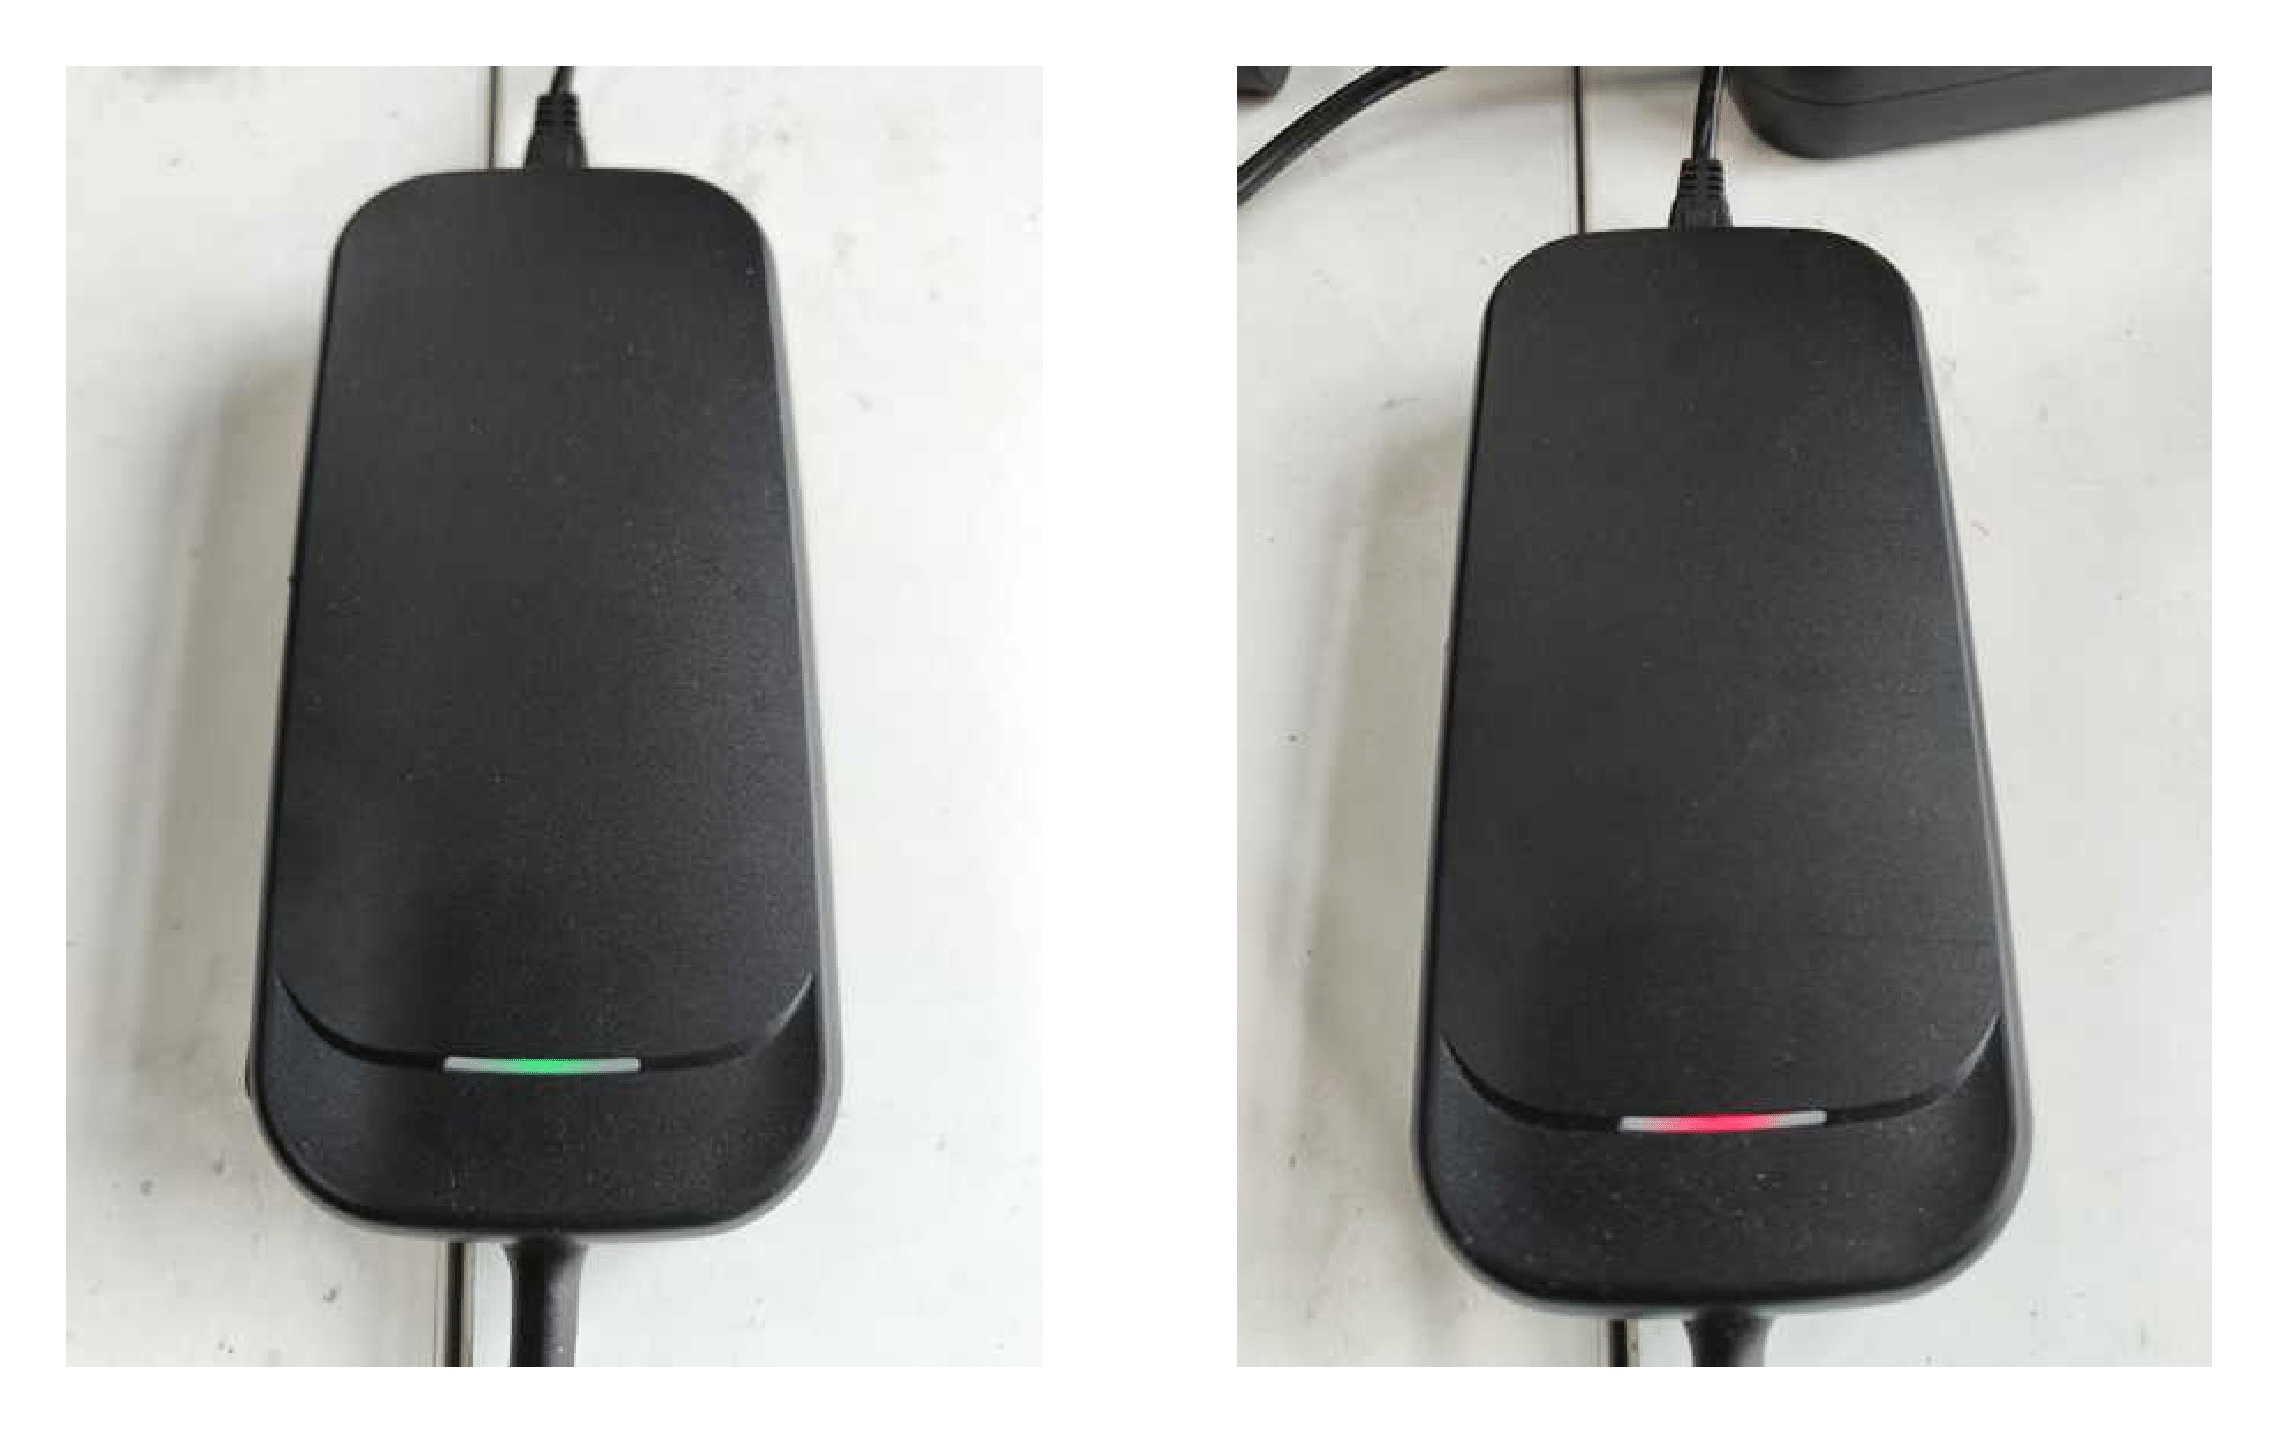
Insert the charging plug according to the indicated direction.
The charging status is shown as follows: the green light indicates a full charge, and the red light indicates charging in progress.
Help
Booster Robotics will, without violating any applicable laws and regulations or involving any personal privacy information, collect only data related to the operation of the robots for the purposes of fault detection and relevant statistical analysis.
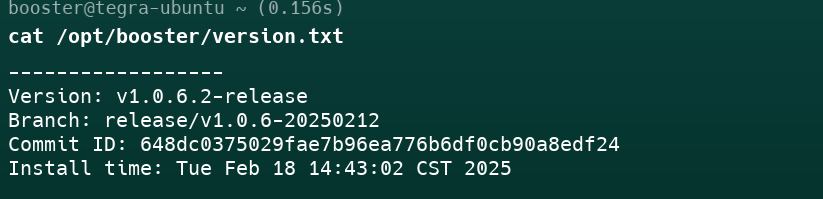
Check Version
After connecting to the robot’s board, run the following command to view the current system version of the robot.
cat /opt/booster/version.txt
Example:
Software Upgrade
When installing a new version of software, the robot’s motion control program will be stopped, and the robot’s joints will not exert force. Before upgrading, ensure the robot is in damping mode or motion control is stopped and has good support (e.g., using a stand to support the robot).
Upgrade with package
Download the latest installation package of the robot software.
Release Date |
Software Version |
Download Link |
Update Content |
|---|---|---|---|
2024.10.22 |
v1.0.1.30 |
gait stability |
|
camera frame rate |
Upgrade K1 Software
First, set the file execution permission:
sudo chmod +x v1.0.1.30-release-single-aarch64.run
Copy the software upgrade package to the K1 board (can be copied to
/home/booster/Downloads), and execute:
./v1.0.1.30-release-single-aarch64.run
Upgrade with command-line
Run this command in K1 board
booster-cli upgrade
The appearance of the following printed content indicates that the system update has been completed

Restore Factory Settings
Introduction
If the robot experiences issues due to configuration changes, try restoring factory settings.
Procedure
navigate to
/home/booster/Documents/recoveryand run:
cd /home/booster/Documents/recovery
./v1.0.1.30-release-single-aarch64.run
Log Retrieval
Introduction
When the robot has issues, tech support may need to obtain the robot’s operation logs. Here’s how to retrieve logs and send them to support.
Procedure
Log into the robot via terminal
Run the command to get the log compressed file: Please note that the robot’s default time zone is UTC+8. If you are in a different time zone, you can either modify the time zone in the robot’s operating system or use the converted time to access the logs
# run this command in terminal
# Usage:
#     -st --start-time [TIME]: Filter logs starting from a specific time (format: YYYYMMDD-HHMMSS, eg:
#     -et --end-time [TIME]: Filter logs ending before a specific time (format: YYYYMMDD-HHMMSS, eg: 20
#     -o, --output [FILE]: Compress logs to a specified output file, default is /home/
booster-cli log -t YYYYMMDD-HHMMSS -o OUTPUT_PATH
Assuming the issue with the robot occurred around 20200808-120810, you can select a time range of approximately ten minutes before and after this point as the start and end times for retrieving the logs, to ensure that the log package covers the time of the issue. Run the following command:
booster-cli log -st 20200808-120800 -et 20200808-120820 -o /home/booster/Documents
After running, a file like 20200808-120800.zip will be generated in
/home/booster/Documents which contains the logs within the specified
time range.
Remote Support
For remote support, please contact us via email: info@bipedal.de
Mobile App
Introduction
The Booster robot can connect to a mobile app for control, status feedback, Bluetooth configuration, and other features.
Download Link (iOS not yet supported):
Application Development
SDK
SDK Overview
The Booster Robotics SDK supports developers in secondary development based on Booster robots. The SDK uses Fast-DDS as the message middleware, compatible with the communication mechanism used in ROS2, allowing mutual communication.
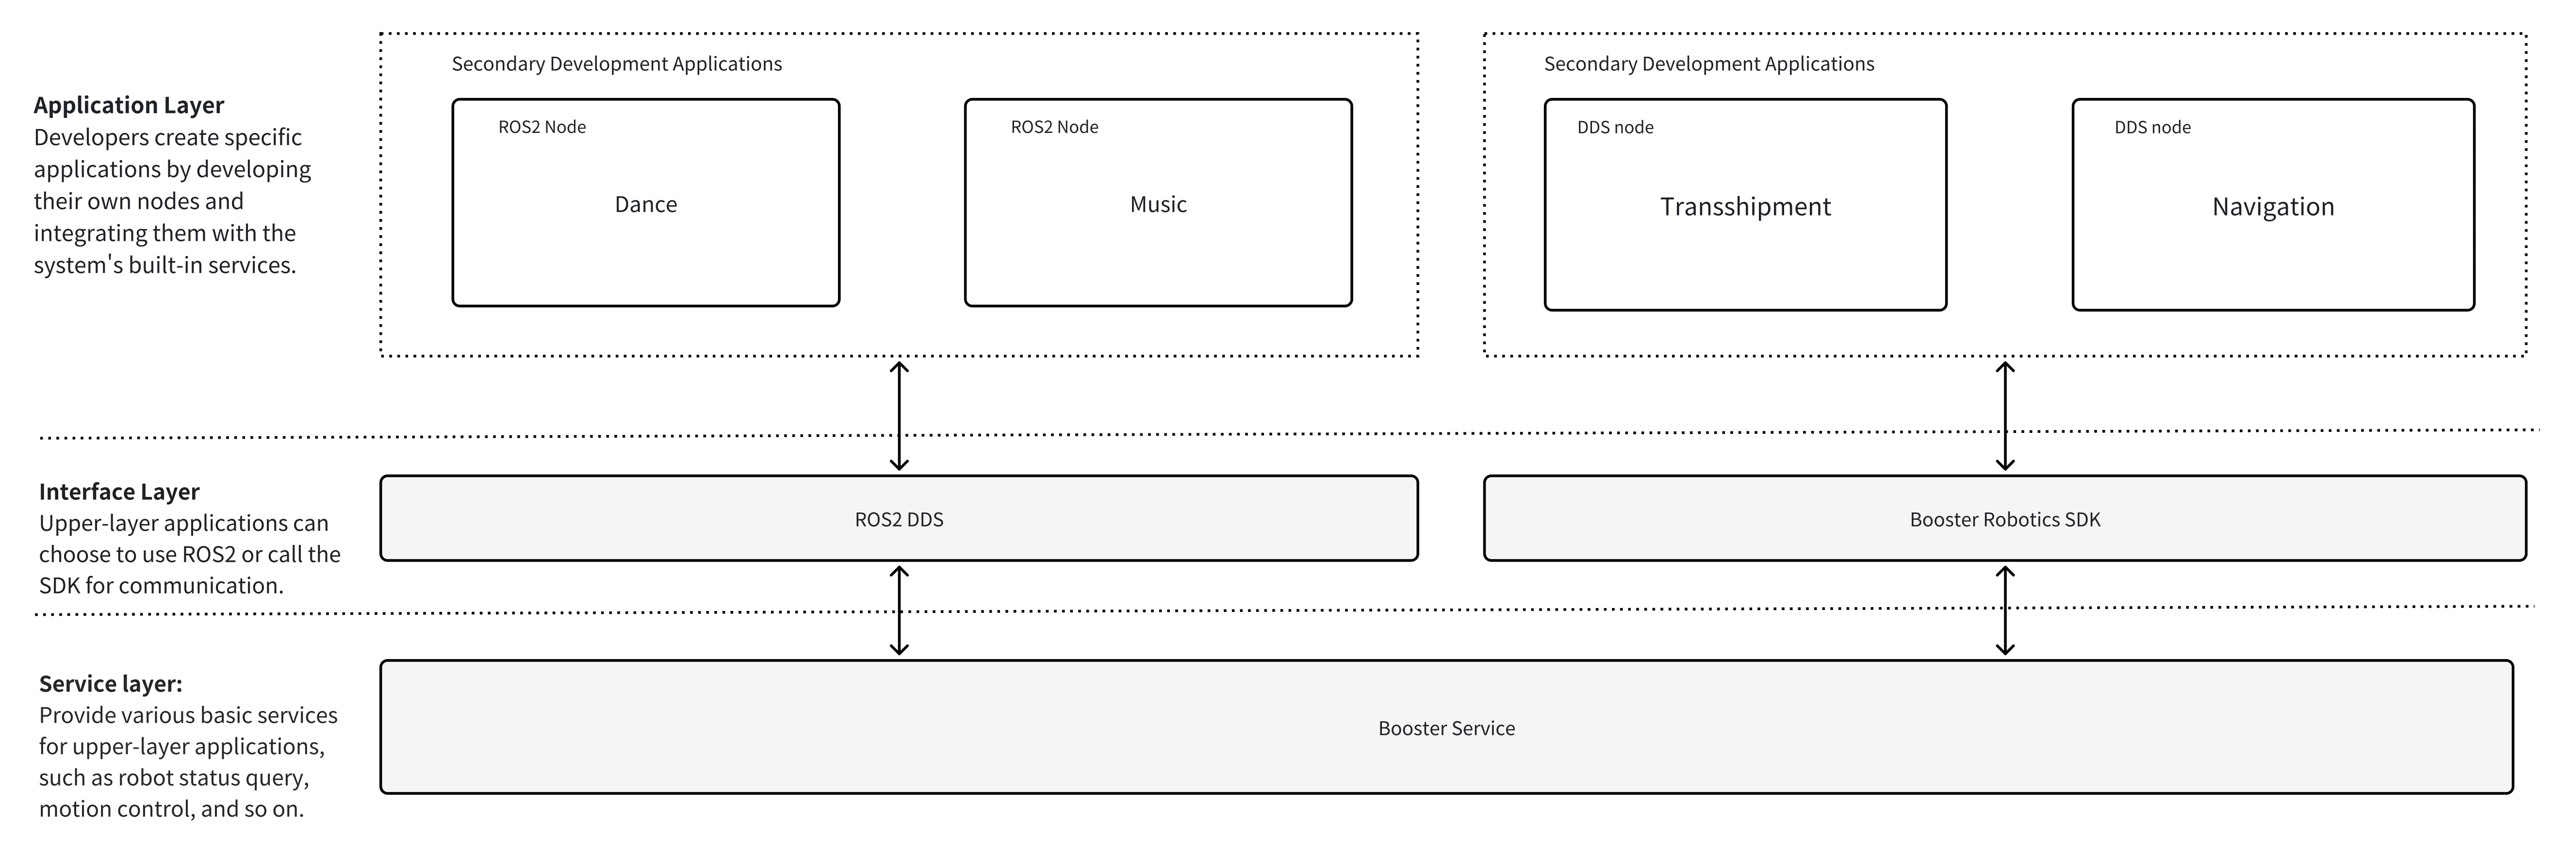
Service Introduction
The Booster system exposes two service levels to developers:
High-level services: For controlling high-level robot movements (state switching, walking, etc.). This is the recommended, safe, and easy way to command the robot.
Advantage: Simple, robust, and protected by the robot’s internal stability controller.
Disadvantage: Less flexible; you are limited to the predefined behaviors.
Low-level services: For real-time sensor data acquisition and direct motor control (CUSTOM mode). This is for advanced users who want to implement their own motion and balance controllers.
Advantage: Full control over every joint; allows for custom gait planning and control research.
Disadvantage: Complex and high-risk. Bypasses all safety controllers.
Why offer both?
This dual-interface allows beginners to get the robot walking in minutes (High-Level) while giving researchers full, low-level access (Low-Level) for deep development.
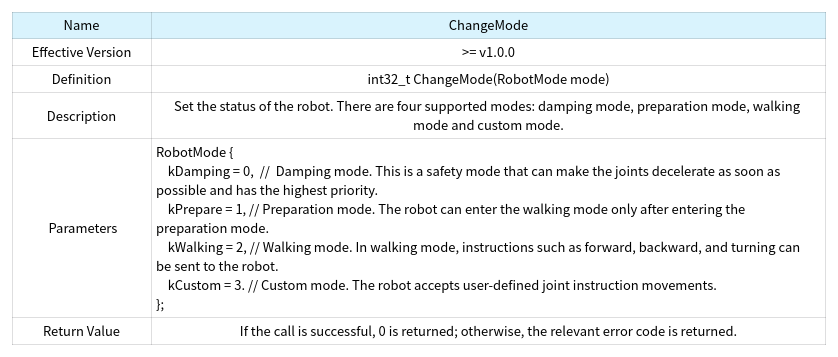
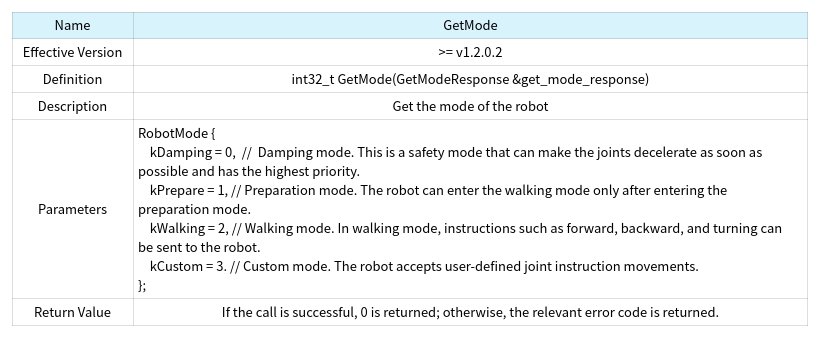
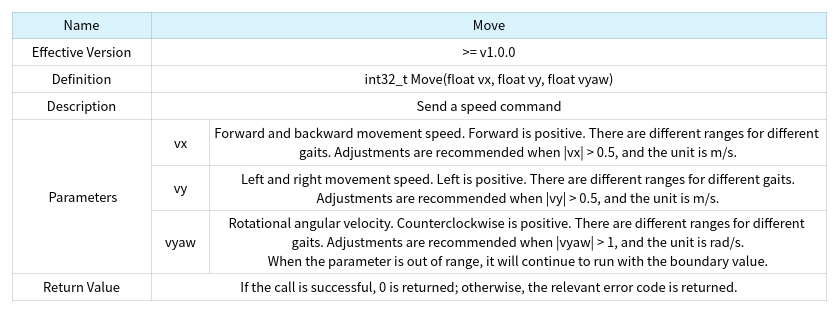
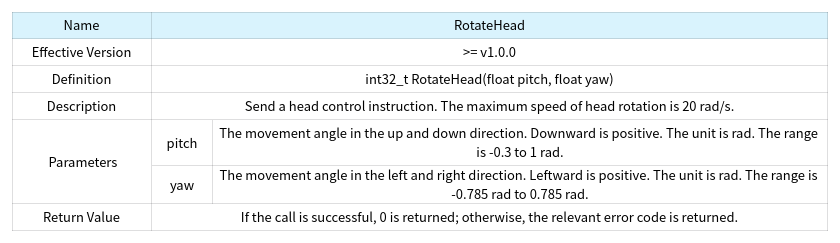
High level service interface
High-level services are available as RPC interfaces

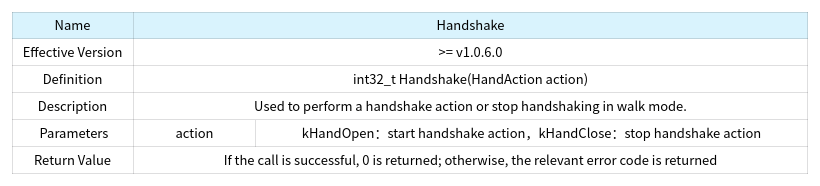
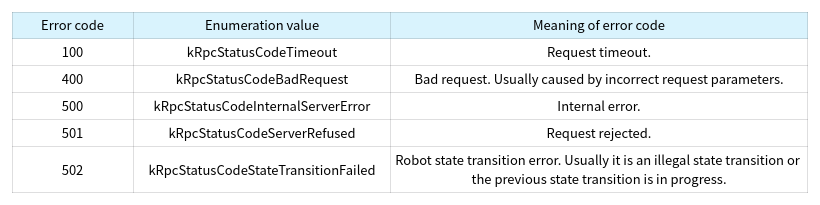
Error codes
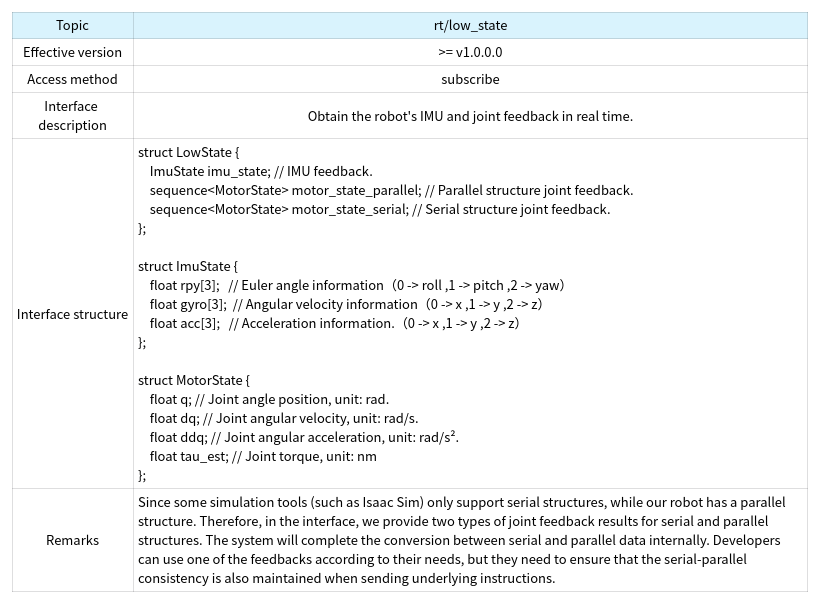
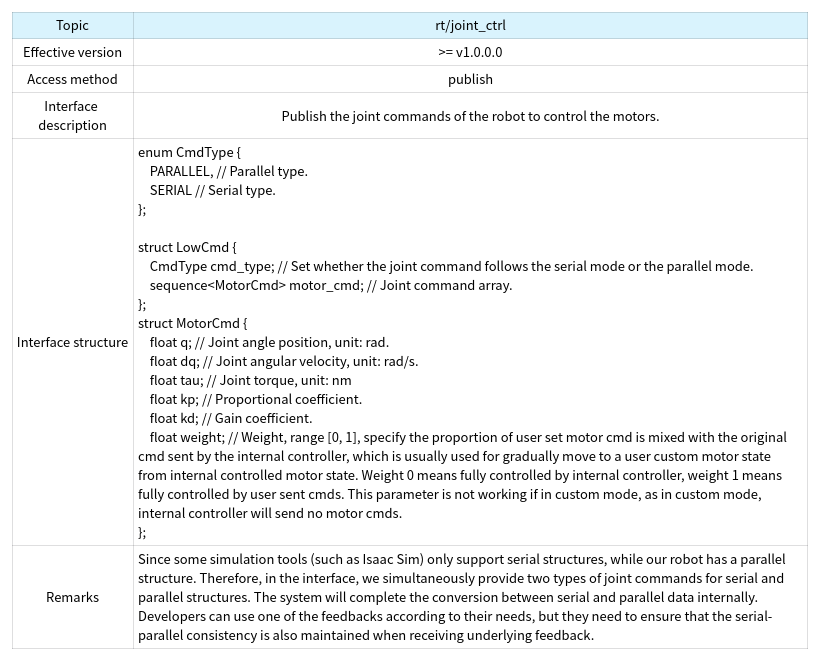
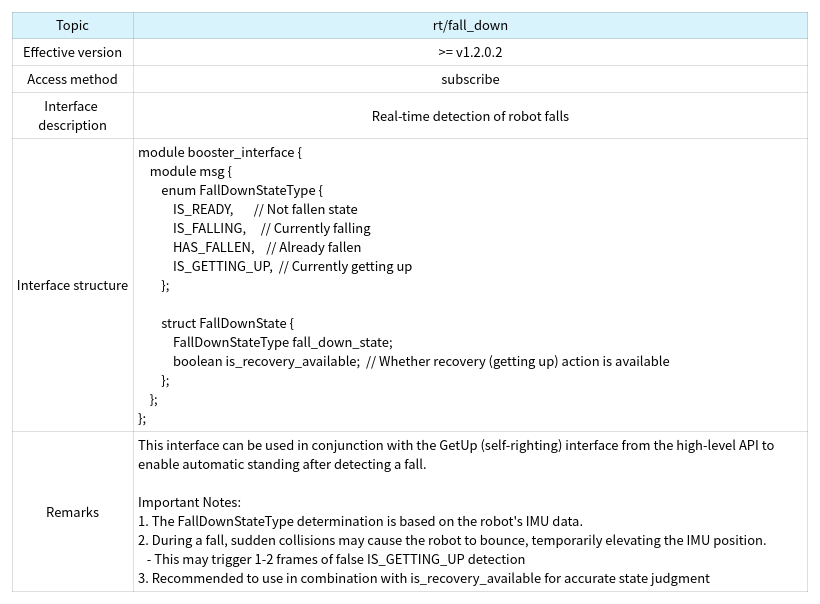
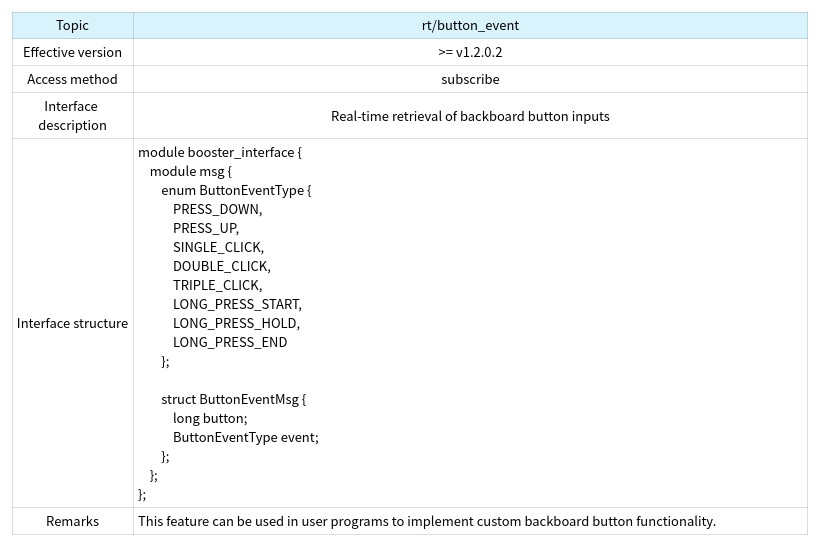
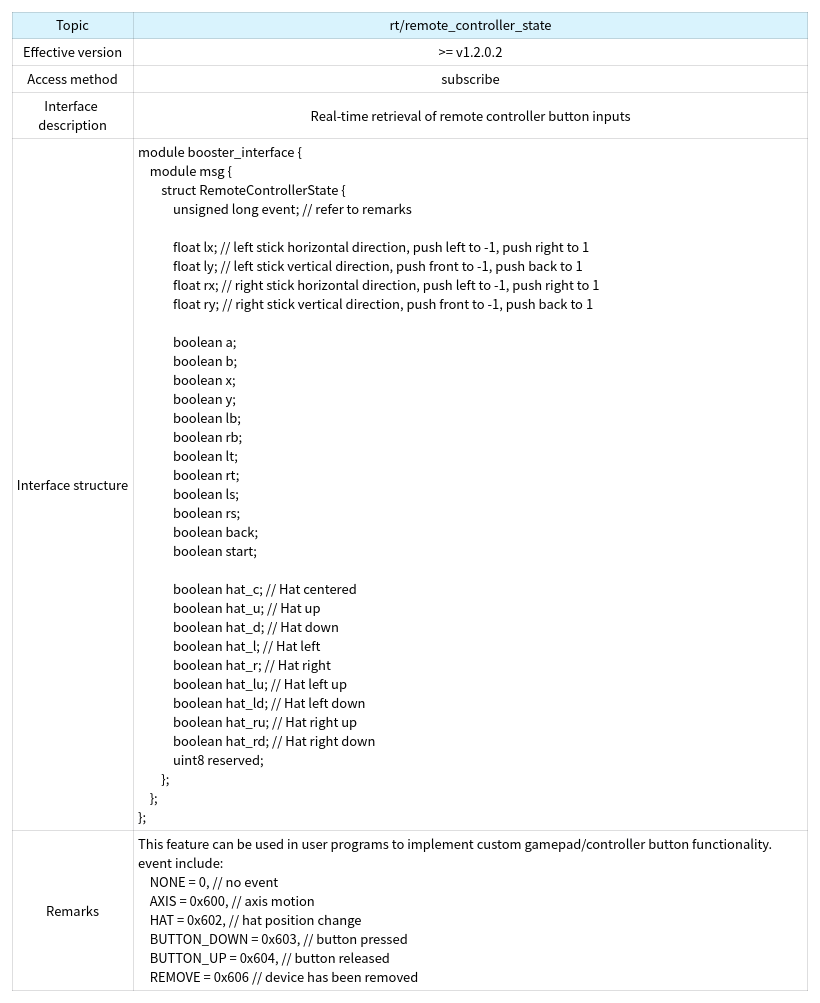
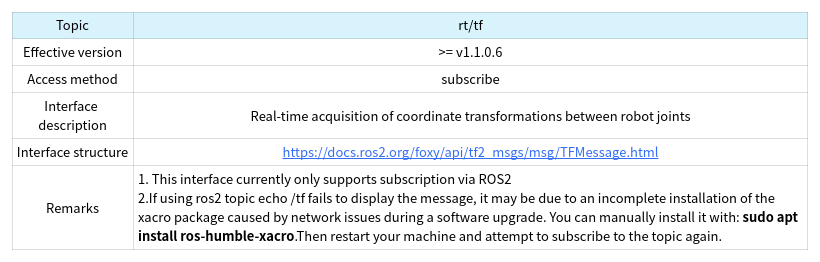
Low level service interface.
WARNING: LOW-LEVEL CONTROL
The Low-Level Service Interface (CUSTOM Mode) gives you direct, unfiltered control over the robot’s motors.
Improper use (e.g., sending high torque commands, exceeding joint limits, or flawed control logic) can and will cause immediate, severe hardware damage to the robot and may create a risk of injury.
Damage caused by the improper use of the low-level interface is not covered under warranty.
Always use a safety hoist and exercise extreme caution.
The low level service interface is called in a ROS-like Publish/Subscribe manner. Please note that the low level publish interface will only take effect when the robot is in custom mode. To enter this mode, please refer to the ChangeMode interface in the high-level API.
SDK Installation
Download Link: https://github.com/BoosterRobotics/booster_robotics_sdk
Follow the README in the repository to complete the SDK installation on the developer’s computer.
Install SDK
# In the booster_robotics_sdk directory
sudo ./install.sh
Compile Sample Programs and Install Python SDK
Assuming the SDK is installed at /home/booster/Workspace navigate to
the SDK project path and run
# you should first install dependencies by
# pip3 install pybind11
# pip3 install pybind11-stubgen

cd /home/booster/Workspace/booster_robotics_sdk
mkdir build
cd build
cmake .. -DBUILD_PYTHON_BINDING=on
make
sudo make install
Compile Only Sample Programs
Assuming the SDK is installed at /home/booster/Workspace navigate to
the SDK project path and run
cd /home/booster/Workspace/booster_robotics_sdk
mkdir build
cd build
cmake ..
make
After compiling, the sample programs will be generated in the build
directory, including the b1_loco_example_client program as a
high-level service interface example.
Simulation and Visualization
Developing in simulation first is a safe and efficient way to test your algorithms before deploying them on the real robot.
FAQ: Simulation Tools
RViZ (ROS Visualization) is a visualizer, not a simulator. You use it to
see the robot’s state in real-time. It displays the robot model (URDF),
sensor data (camera feeds, LiDAR scans), and diagnostic information
(like /tf frames).
Gazebo is a physics simulator. You use it to test how the robot interacts with a 3D world. It simulates gravity, friction, and collisions. It is the standard for testing ROS-based control and navigation algorithms.
Isaac Sim is an advanced, photorealistic, and physics-based simulator built on NVIDIA Omniverse. It is ideal for AI and Machine Learning applications, especially “Sim-to-Real” reinforcement learning for tasks like Dynamic Gait Planning.
Depending on your needs, one simulator may be more suitable than the other. The following table summarizes the better-suited simulator for various demands.
Demand |
Better suitable simulator |
|---|---|
Physics simulation |
Gazebo |
Evaluation of vision-based algorithms |
NVIDIA Isaac Sim |
Evaluation of optical-/laser-based algorithms |
Gazebo (until NIS utilizes raytracing for laser simulation) |
Project duration |
Short- & medium-term: Gazebo Long-term: NVIDIA Isaac Sim |
Simulation of UAVs or UUVs |
Gazebo |
Availability of moving objects and persons |
Gazebo |
Please note that these recommendations are just guidelines and may vary based on specific project requirements.
Please find the necessary model files (URDF, MJCF, USD) in Section 7.